Cool Injection Moulding images

Cool Injection Moulding images

Some cool injection moulding images:

Injection Molded Version Faceup

Image by Danny Choo
View more at www.dannychoo.com/en/post/27855/Injection+Molded+Version+…

Injection molding Easter egg

Image by Ryan Finnie
Found under the front panel of a Dell Inspiron 660s

CreativeTools.se – ZPrinter-made plastic injection mold 45

Image by Creative Tools
SVENSKA
Dessa bilder visar hur ett plastmynt med vår logotyp skapades med hjälp av en ZPrinter 3D-skrivare från Z Corporation. Först skapades myntet och gjutformen i Rhino 3D. Därefter printade 3D-printern en gjutform i gips som härdades med Epoxylim. Efter det kunde flera mynt i plast formsprutas i den 3D-utskrivna formen!

ENGLISH
These images show how a plastic coin with our logo was made with the help of a ZPrinter 3D-printer form Z Corporation. First the model and the mold was made in Rhino 3D. Then we 3D-printed the mold with our ZPrinter 650 and hardened it with Epoxy. After that we could produce several plastic coins with our desktop injection molding machine.

3d-skrivare.creativetools.se

Nice Two Shots Mould China photos

Nice Two Shots Mould China photos

Check out these two shots mould china images:

CPR / My Neighbour to the West
two shots mould china
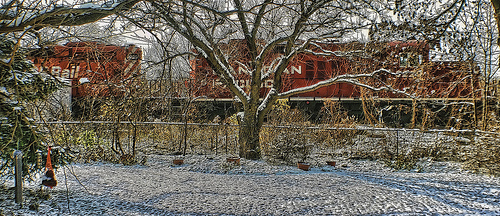
Image by bill barber
From my set entitled “Our Home, Streetsville”
www.flickr.com/photos/21861018@N00/sets/72157600265395738/
In my collection entitled “Places”
www.flickr.com/photos/21861018@N00/collections/7215760074…
In my photostream
www.flickr.com/photos/21861018@N00/

I’ve always lived close to railway lines. When I was growing up in Orangeville, Ontario, I lived near the main station. Both the Canadian National Railway (CNR) and the Canadian Pacific Railway (CPR) passed through town. When my sister and I moved to a fifty acre farm in Dixie, Ontario (near Toronto) in 1960, the CPR bisected our land.

For the twenty-two years Karen and I have lived at our current address in Streetsville, Ontario, the CPR has been our neighbour across the back fence. People ask us, “Don’t the trains bother you?” We answer that we don’t even hear them.

We sit on the deck and view a lot of interesting stuff go by. One day I watched a trainload of tanks pass. Didn’t know Canada had so many tanks. We also see intriguing graffiti on the sides of tankers and boxcars. And there are cars from all over the U.S. and Canada.

This is the first shot of the trains I have taken from the deck, but there will be more. It’s best to take such pictures after the leaves have dropped, since it’s hard to see the trains through the summer foliage.

Reproduced from Wikipedia, the free encyclopedia
en.wikipedia.org/wiki/Canadian_Pacific_Railway
The Canadian Pacific Railway (CPR; AAR reporting marks CP, CPAA, CPI), known as CP Rail between 1968 and 1996, is a Canadian Class I railway operated by Canadian Pacific Railway Limited. Its rail network stretches from Vancouver to Montreal, and also serves major cities in the United States such as Minneapolis, Chicago, and New York City. Its headquarters are in Calgary, Alberta.

The railway was originally built between eastern Canada and British Columbia between 1881 and 1885 (connecting with Ottawa Valley and Georgian Bay area lines built earlier), fulfilling a promise extended to British Columbia when it entered Confederation in 1871. It was Canada’s first transcontinental railway. Now primarily a freight railway, the CPR was for decades the only practical means of long distance passenger transport in most regions of Canada, and was instrumental in the settlement and development of Western Canada. The CP company became one of the largest and most powerful in Canada, a position it held as late as 1975.[1] Its primary passenger services were eliminated in 1986 after being assumed by VIA Rail Canada in 1978. A beaver was chosen as the railway’s logo because it is one of the national symbols of Canada and represents the hardworking character of the company. The object of both praise and condemnation for over 120 years, the CPR remains an indisputable icon of Canadian nationalism.

The Canadian Pacific Railway is a public company with over 15,000 employees and market capitalization of 7 billion USD in 2008.[2]

Canada’s very existence depended on the successful completion of the major civil engineering project, the creation of a transcontinental railway. Creation of the Canadian Pacific Railway was a task originally undertaken for a combination of reasons by the Conservative government of Prime Minister Sir John A. Macdonald. British Columbia had insisted upon a transport link to the east as a condition for joining the Confederation of Canada (initially requesting a wagon road). The government however, proposed to build a railway linking the Pacific province to the eastern provinces within ten years of July 20, 1871. Macdonald also saw it as essential to the creation of a unified Canadian nation that would stretch across the continent. Moreover, manufacturing interests in Quebec and Ontario desired access to sources of raw materials and markets in Canada’s west.

The first obstacle to its construction was economic. The logical route went through the American Midwest and the city of Chicago, Illinois. In addition to the obvious difficulty of building a railroad through the Canadian Rockies, an entirely Canadian route would require crossing 1,600 km (1,000 miles) of rugged terrain of the barren Canadian Shield and muskeg of Northern Ontario. To ensure this routing, the government offered huge incentives including vast grants of land in Western Canada.

In 1872, Sir John A. Macdonald and other high-ranking politicians, swayed by bribes in the so-called Pacific Scandal, granted federal contracts to Hugh Allan’s "Canada Pacific Railway Company" (which was unrelated to the current company) and to the Inter-Ocean Railway Company. Because of this scandal, the Conservative party was removed from office in 1873. The new Liberal prime minister, Alexander Mackenzie, began construction of segments of the railway as a public enterprise under the supervision of the Department of Public Works. The Thunder Bay branch linking Lake Superior to Winnipeg was commenced in 1875. Progress was discouragingly slow because of the lack of public money. With Sir John A. Macdonald’s return to power on October 16, 1878, a more aggressive construction policy was adopted. Macdonald confirmed that Port Moody would be the terminus of the transcontinental railway, and announced that the railway would follow the Fraser and Thompson rivers between Port Moody and Kamloops. In 1879, the federal government floated bonds in London and called for tenders to construct the 206 km (128 mile) section of the railway from Yale, British Columbia to Savona’s Ferry on Kamloops Lake. The contract was awarded to Andrew Onderdonk, whose men started work on May 15, 1880. After the completion of that section, Onderdonk received contracts to build between Yale and Port Moody, and between Savona’s Ferry and Eagle Pass.

On October 21, 1880, a new syndicate, unrelated to Hugh Allan’s, signed a contract with the Macdonald government. They agreed to build the railway in exchange for ,000,000 (approximately 5,000,000 in modern Canadian dollars) in credit from the Canadian government and a grant of 25,000,000 acres (100,000 km²) of land. The government transferred to the new company those sections of the railway it had constructed under government ownership. The government also defrayed surveying costs and exempted the railway from property taxes for 20 years. The Montreal-based syndicate officially comprised five men: George Stephen, James J. Hill, Duncan McIntyre, Richard B. Angus, and John Stewart Kennedy. Donald A. Smith and Norman Kittson were unofficial silent partners with a significant financial interest. On February 15, 1881, legislation confirming the contract received royal assent, and the Canadian Pacific Railway Company was formally incorporated the next day.

The CPR started its westward expansion from Bonfield, Ontario (previously called Callander Station) where the first spike was driven into a sunken railway tie. Bonfield, Ontario was inducted into Canadian Railway Hall of Fame in 2002 as the CPR First Spike location. That was the point where the Canada Central Railway extension ended. The CCR was owned by Duncan McIntyre who amalgamated it with the CPR and became one of the handful of officers of the newly formed CPR. The CCR started in Brockville and extended to Pembroke. It then followed a westward route along the Ottawa River passing through places like Cobden, Deux-Rivières, and eventually to Mattawa at the confluence of the Mattawa and Ottawa Rivers. It then proceeded cross-country towards its final destination Bonfield (previously called Callander Station).

Duncan McIntyre and his contractor James Worthington piloted the CCR expansion. Worthington continued on as the construction superintendent for the CPR past Bonfield. He remained with the CPR for about a year until he left the company. McIntyre was uncle to John Ferguson who staked out future North Bay after getting assurance from his uncle and Worthington that it would be the divisional and a location of some importance.

It was assumed that the railway would travel through the rich "Fertile Belt" of the North Saskatchewan River valley and cross the Rocky Mountains via the Yellowhead Pass, a route suggested by Sir Sandford Fleming based on a decade of work. However, the CPR quickly discarded this plan in favour of a more southerly route across the arid Palliser’s Triangle in Saskatchewan and through Kicking Horse Pass over the Field Hill. This route was more direct and closer to the American border, making it easier for the CPR to keep American railways from encroaching on the Canadian market. However, this route also had several disadvantages.

One consequence was that the CPR would need to find a route through the Selkirk Mountains, as at the time it was not known whether a route even existed. The job of finding a pass was assigned to a surveyor named Major Albert Bowman Rogers. The CPR promised him a cheque for ,000 and that the pass would be named in his honour. Rogers became obsessed with finding the pass that would immortalize his name. He found the pass on May 29, 1881, and true to its word, the CPR named the pass "Rogers Pass" and gave him the cheque. This however, he at first refused to cash, preferring to frame it, and saying he did not do it for the money. He later agreed to cash it with the promise of an engraved watch.

Another obstacle was that the proposed route crossed land controlled by the Blackfoot First Nation. This difficulty was overcome when a missionary priest, Albert Lacombe, persuaded the Blackfoot chief Crowfoot that construction of the railway was inevitable.

In return for his assent, Crowfoot was famously rewarded with a lifetime pass to ride the CPR. A more lasting consequence of the choice of route was that, unlike the one proposed by Fleming, the land surrounding the railway often proved too arid for successful agriculture. The CPR may have placed too much reliance on a report from naturalist John Macoun, who had crossed the prairies at a time of very high rainfall and had reported that the area was fertile.

The greatest disadvantage of the route was in Kicking Horse Pass. In the first 6 km (3.7 miles) west of the 1,625 metre (5,330 ft) high summit, the Kicking Horse River drops 350 metres (1,150 ft). The steep drop would force the cash-strapped CPR to build a 7 km (4.5 mile) long stretch of track with a very steep 4.5% gradient once it reached the pass in 1884. This was over four times the maximum gradient recommended for railways of this era, and even modern railways rarely exceed a 2% gradient. However, this route was far more direct than one through the Yellowhead Pass, and saved hours for both passengers and freight. This section of track was the CPR’s Big Hill. Safety switches were installed at several points, the speed limit for descending trains was set at 10 km per hour (6 mph), and special locomotives were ordered. Despite these measures, several serious runaways still occurred. CPR officials insisted that this was a temporary expediency, but this state of affairs would last for 25 years until the completion of the Spiral Tunnels in the early 20th century.

In 1881 construction progressed at a pace too slow for the railway’s officials, who in 1882 hired the renowned railway executive William Cornelius Van Horne, to oversee construction with the inducement of a generous salary and the intriguing challenge of handling such a difficult railway project. Van Horne stated that he would have 800 km (500 miles) of main line built in 1882. Floods delayed the start of the construction season, but over 672 km (417 miles) of main line, as well as various sidings and branch lines, were built that year. The Thunder Bay branch (west from Fort William) was completed in June 1882 by the Department of Railways and Canals and turned over to the company in May 1883, permitting all-Canadian lake and rail traffic from eastern Canada to Winnipeg for the first time in Canada’s history. By the end of 1883, the railway had reached the Rocky Mountains, just eight km (5 miles) east of Kicking Horse Pass. The construction seasons of 1884 and 1885 would be spent in the mountains of British Columbia and on the north shore of Lake Superior.

Many thousands of navvies worked on the railway. Many were European immigrants. In British Columbia, the CPR hired workers from China, nicknamed coolies. A navvy received between and .50 per day, but had to pay for his own food, clothing, transportation to the job site, mail, and medical care. After two and a half months of back-breaking labour, they could net as little as . Chinese navvies in British Columbia made only between .75 and .25 a day, not including expenses, leaving barely anything to send home. They did the most dangerous construction jobs, such as working with explosives. The families of the Chinese who were killed received no compensation, or even notification of loss of life. Many of the men who survived did not have enough money to return to their families in China. Many spent years in lonely, sad and often poor conditions. Yet the Chinese were hard working and played a key role in building the western stretch of the railway; even some boys as young as 12 years old served as tea-boys.

By 1883, railway construction was progressing rapidly, but the CPR was in danger of running out of funds. In response, on January 31, 1884, the government passed the Railway Relief Bill, providing a further ,500,000 in loans to the CPR. The bill received royal assent on March 6, 1884.

In March 1885, the North-West Rebellion broke out in the District of Saskatchewan. Van Horne, in Ottawa at the time, suggested to the government that the CPR could transport troops to Qu’Appelle, Assiniboia, in eleven days. Some sections of track were incomplete or had not been used before, but the trip to Winnipeg was made in nine days and the rebellion was quickly put down. Perhaps because the government was grateful for this service, they subsequently re-organized the CPR’s debt and provided a further ,000,000 loan. This money was desperately needed by the CPR. On November 7, 1885 the Last Spike was driven at Craigellachie, British Columbia, making good on the original promise. Four days earlier, the last spike of the Lake Superior section was driven in just west of Jackfish, Ontario. While the railway was completed four years after the original 1881 deadline, it was completed more than five years ahead of the new date of 1891 that Macdonald gave in 1881.

The successful construction of such a massive project, although troubled by delays and scandal, was considered an impressive feat of engineering and political will for a country with such a small population, limited capital, and difficult terrain. It was by far the longest railway ever constructed at the time. It had taken 12,000 men, 5,000 horses, and 300 dog-sled teams to build the railway.

Meanwhile, in Eastern Canada, the CPR had created a network of lines reaching from Quebec City to St. Thomas, Ontario by 1885, and had launched a fleet of Great Lakes ships to link its terminals. The CPR had effected purchases and long-term leases of several railways through an associated railway company, the Ontario and Quebec Railway (O&Q). The O&Q built a line between Perth, Ontario, and Toronto (completed on May 5, 1884) to connect these acquisitions. The CPR obtained a 999-year lease on the O&Q on January 4, 1884. Later, in 1895, it acquired a minority interest in the Toronto, Hamilton and Buffalo Railway, giving it a link to New York and the northeast US.

So many cost-cutting shortcuts were taken in constructing the railway that regular transcontinental service could not start for another seven months while work was done to improve the railway’s condition. However, had these shortcuts not been taken, it is conceivable that the CPR might have had to default financially, leaving the railway unfinished. The first transcontinental passenger train departed from Montreal’s Dalhousie Station, located at Berri Street and Notre Dame Street on June 28, 1886 at 8:00 p.m. and arrived at Port Moody on July 4, 1886 at noon. This train consisted of two baggage cars, a mail car, one second-class coach, two immigrant sleepers, two first-class coaches, two sleeping cars, and a diner.

By that time, however, the CPR had decided to move its western terminus from Port Moody to Gastown, which was renamed "Vancouver" later that year. The first official train destined for Vancouver arrived on May 23, 1887, although the line had already been in use for three months. The CPR quickly became profitable, and all loans from the Federal government were repaid years ahead of time.

In 1888, a branch line was opened between Sudbury and Sault Ste. Marie where the CPR connected with the American railway system and its own steamships. That same year, work was started on a line from London, Ontario to the American border at Windsor, Ontario. That line opened on June 12, 1890.

The CPR also leased the New Brunswick Railway for 999 years and built the International Railway of Maine, connecting Montreal with Saint John, New Brunswick in 1889. The connection with Saint John on the Atlantic coast made the CPR the first truly transcontinental railway company and permitted trans-Atlantic cargo and passenger services to continue year-round when sea ice in the Gulf of St. Lawrence closed the port of Montreal during the winter months.

By 1896, competition with the Great Northern Railway for traffic in southern British Columbia forced the CPR to construct a second line across the province, south of the original line. Van Horne, now president of the CPR, asked for government aid, and the government agreed to provide around .6 million to construct a railway from Lethbridge, Alberta through Crowsnest Pass to the south shore of Kootenay Lake, in exchange for the CPR agreeing to reduce freight rates in perpetuity for key commodities shipped in Western Canada. The controversial Crowsnest Pass Agreement effectively locked the eastbound rate on grain products and westbound rates on certain "settlers’ effects" at the 1897 level. Although temporarily suspended during World War I, it was not until 1983 that the "Crow Rate" was permanently replaced by the Western Grain Transportation Act which allowed for the gradual increase of grain shipping prices. The Crowsnest Pass line opened on June 18, 1899.

Practically speaking, the CPR had built a railway that operated mostly in the wilderness. The usefulness of the Prairies was questionable in the minds of many. The thinking prevailed that the Prairies had great potential. Under the initial contract with the Canadian Government to build the railway, the CPR was granted 25,000,000 acres (100,000 km²). Proving already to be a very resourceful organization, Canadian Pacific began an intense campaign to bring immigrants to Canada.

Canadian Pacific agents operated in many overseas locations. Immigrants were often sold a package that included passage on a CP ship, travel on a CP train, and land sold by the CP railway. Land was priced at .50 an acre and up. Immigrants paid very little for a seven-day journey to the West. They rode in Colonist cars that had sleeping facilities and a small kitchen at one end of the car. Children were not allowed off the train, lest they wander off and be left behind. The directors of the CPR knew that not only were they creating a nation, but also a long-term source of revenue for their company.

During the first decade of the twentieth century, the CPR continued to build more lines. In 1908 the CPR opened a line connecting Toronto with Sudbury. Previously, westbound traffic originating in southern Ontario took a circuitous route through eastern Ontario.
Several operational improvements were also made to the railway in western Canada. In 1909 the CPR completed two significant engineering accomplishments. The most significant was the replacement of the Big Hill, which had become a major bottleneck in the CPR’s main line, with the Spiral Tunnels, reducing the grade to 2.2% from 4.5%. The Spiral Tunnels opened in August. On November 3, 1909, the Lethbridge Viaduct over the Oldman River valley at Lethbridge, Alberta was opened. It is 1,624 metres (5,327 ft) long and, at its maximum, 96 metres (314 ft) high, making it the longest railway bridge in Canada. In 1916 the CPR replaced its line through Rogers Pass, which was prone to avalanches, with the Connaught Tunnel, an eight km (5 mile) long tunnel under Mount Macdonald that was, at the time of its opening, the longest railway tunnel in the Western Hemisphere.

The CPR acquired several smaller railways via long-term leases in 1912. On January 3, 1912, the CPR acquired the Dominion Atlantic Railway, a railway that ran in western Nova Scotia. This acquisition gave the CPR a connection to Halifax, a significant port on the Atlantic Ocean. The Dominion Atlantic was isolated from the rest of the CPR network and used the CNR to facilitate interchange; the DAR also operated ferry services across the Bay of Fundy for passengers and cargo (but not rail cars) from the port of Digby, Nova Scotia to the CPR at Saint John, New Brunswick. DAR steamships also provided connections for passengers and cargo between Yarmouth, Boston and New York.

On July 1, 1912, the CPR acquired the Esquimalt and Nanaimo Railway, a railway on Vancouver Island that connected to the CPR using a railcar ferry. The CPR also acquired the Quebec Central Railway on December 14, 1912.

During the late 19th century, the railway undertook an ambitious program of hotel construction, building the Château Frontenac in Quebec City, the Royal York Hotel in Toronto, the Banff Springs Hotel, and several other major Canadian landmarks. By then, the CPR had competition from three other transcontinental lines, all of them money-losers. In 1919, these lines were consolidated, along with the track of the old Intercolonial Railway and its spurs, into the government-owned Canadian National Railways.

When World War I broke out in 1914, the CPR devoted resources to the war effort, and managed to stay profitable while its competitors struggled to remain solvent. After the war, the Federal government created Canadian National Railways (CNR, later CN) out of several bankrupt railways that fell into government hands during and after the war. CNR would become the main competitor to the CPR in Canada.

The Great Depression, which lasted from 1929 until 1939, hit many companies heavily. While the CPR was affected, it was not affected to the extent of its rival CNR because it, unlike the CNR, was debt-free. The CPR scaled back on some of its passenger and freight services, and stopped issuing dividends to its shareholders after 1932.

One highlight of the 1930s, both for the railway and for Canada, was the visit of King George VI and Queen Elizabeth to Canada in 1939, the first time that the reigning monarch had visited the country. The CPR and the CNR shared the honours of pulling the royal train across the country, with the CPR undertaking the westbound journey from Quebec City to Vancouver.

Later that year, World War II began. As it had done in World War I, the CPR devoted much of its resources to the war effort. It retooled its Angus Shops in Montreal to produce Valentine tanks, and transported troops and resources across the country. As well, 22 of the CPR’s ships went to warfare, 12 of which were sunk.

After World War II, the transportation industry in Canada changed. Where railways had previously provided almost universal freight and passenger services, cars, trucks, and airplanes started to take traffic away from railways. This naturally helped the CPR’s air and trucking operations, and the railway’s freight operations continued to thrive hauling resource traffic and bulk commodities. However, passenger trains quickly became unprofitable.

During the 1950s, the railway introduced new innovations in passenger service, and in 1955 introduced The Canadian, a new luxury transcontinental train. However, starting in the 1960s the company started to pull out of passenger services, ending services on many of its branch lines. It also discontinued its transcontinental train The Dominion in 1966, and in 1970 unsuccessfully applied to discontinue The Canadian. For the next eight years, it continued to apply to discontinue the service, and service on The Canadian declined markedly. On October 29, 1978, CP Rail transferred its passenger services to VIA Rail, a new federal Crown corporation that is responsible for managing all intercity passenger service formerly handled by both CP Rail and CN. VIA eventually took almost all of its passenger trains, including The Canadian, off CP’s lines.

In 1968, as part of a corporate re-organization, each of the CPR’s major operations, including its rail operations, were organized as separate subsidiaries. The name of the railway was changed to CP Rail, and the parent company changed its name to Canadian Pacific Limited in 1971. Its express, telecommunications, hotel and real estate holdings were spun off, and ownership of all of the companies transferred to Canadian Pacific Investments. The company discarded its beaver logo, adopting the new Multimark logo that could be used for each of its operations.

In 1984 CP Rail commenced construction of the Mount Macdonald Tunnel to augment the Connaught Tunnel under the Selkirk Mountains. The first revenue train passed through the tunnel in 1988. At 14.7 km (9 miles), it is the longest tunnel in the Americas.

During the 1980s, the Soo Line, in which CP Rail still owned a controlling interest, underwent several changes. It acquired the Minneapolis, Northfield and Southern Railway in 1982. Then on February 21, 1985, the Soo Line obtained a controlling interest in the Milwaukee Road, merging it into its system on January 1, 1986. Also in 1980 Canadian Pacific bought out the controlling interests of the Toronto, Hamilton and Buffalo Railway (TH&B) from Conrail and molded it into the Canadian Pacific System, dissolving the TH&B’s name from the books in 1985. In 1987 most of CPR’s trackage in the Great Lakes region, including much of the original Soo Line, were spun off into a new railway, the Wisconsin Central, which was subsequently purchased by CN.

Influenced by the Canada-U.S. Free Trade Agreement of 1989 which liberalized trade between the two nations, the CPR’s expansion continued during the early 1990s: CP Rail gained full control of the Soo Line in 1990, and bought the Delaware and Hudson Railway in 1991. These two acquisitions gave CP Rail routes to the major American cities of Chicago (via the Soo Line) and New York City (via the D&H).

During the next few years CP Rail downsized its route, and several Canadian branch lines were either sold to short lines or abandoned. This included all of its lines east of Montreal, with the routes operating across Maine and New Brunswick to the port of Saint John (operating as the Canadian Atlantic Railway) being sold or abandoned, severing CPR’s transcontinental status (in Canada); the opening of the St. Lawrence Seaway in the late 1950s, coupled with subsidized icebreaking services, made Saint John surplus to CPR’s requirements. During the 1990s, both CP Rail and CN attempted unsuccessfully to buy out the eastern assets of the other, so as to permit further rationalization. As well, it closed divisional and regional offices, drastically reduced white collar staff, and consolidated its Canadian traffic control system in Calgary, Alberta.

Finally, in 1996, reflecting the increased importance of western traffic to the railway, CP Rail moved its head office to Calgary from Montreal and changed its name back to Canadian Pacific Railway. A new subsidiary company, the St. Lawrence and Hudson Railway, was created to operate its money-losing lines in eastern North America, covering Quebec, Southern and Eastern Ontario, trackage rights to Chicago, Illinois, as well as the Delaware and Hudson Railway in the U.S. Northeast. However, the new subsidiary, threatened with being sold off and free to innovate, quickly spun off losing track to short lines, instituted scheduled freight service, and produced an unexpected turn-around in profitability. After only four years, CPR revised its opinion and the StL&H formally re-amalgamated with its parent on January 1, 2001.

In 2001, the CPR’s parent company, Canadian Pacific Limited, spun off its five subsidiaries, including the CPR, into independent companies. Canadian Pacific Railway formally (but, not legally) shortened its name to Canadian Pacific in early 2007, dropping the word "railway" in order to reflect more operational flexibility. Shortly after the name revision, Canadian Pacific announced that it had committed to becoming a major sponsor and logistics provider to the 2010 Olympic Winter Games in Vancouver, British Columbia.

On September 4, 2007, CPR announced it was acquiring the Dakota, Minnesota and Eastern Railroad from its present owners, London-based Electra Private Equity.[3] The transaction is an "end-to-end" consolidation,[4][5] and will give CPR access to U.S. shippers of agricultural products, ethanol, and coal. CPR has stated its intention to use this purchase to gain access to the rich coal fields of Wyoming’s Powder River Basin. The purchase price is US.48 billion, and future payments of over US.0 billion contingent on commencement of construction on the smaller railroad’s Powder River extension and specified volumes of coal shipments from the Powder River basin.[4] The transaction was subject to approval of the U.S. Surface Transportation Board (STB), which was expected to take a year.[4] On October 4, 2007, CPR announced it has completed the financial transactions required for the acquisition, placing the DM&E and IC&E in a voting trust with Richard Hamlin appointed as the trustee. CPR planned to integrate the railroads’ operations once the STB approves the acquisition.[6] The merger was completed as of October 31, 2008.[7]

Post Processing;
Topaz: vibrance
PhotoShop Elements 5: crop, multiply, posterization, ink outlines, sandstone texture

Nice High Quality Plastic Mould photos

Nice High Quality Plastic Mould photos

A few nice high quality plastic mould images I found:

The Guinness “widget”
high quality plastic mould
Image by slworking2
Curiosity got the best of me tonight and I decided to cut open a can of
Guinness in order to have a closer look at the "widget".

From Wikipedia, the free encyclopedia

The "floating widget" found in cans of beer is a hollow sphere, 3 cm in diameter. The can is pressurised by adding liquid nitrogen, which vaporises and expands in
volume after the can is sealed, forcing gas and beer into the widget’s
hollow interior through a tiny hole – the less beer the better for
subsequent head quality. In addition some nitrogen dissolves in the beer
which also contains dissolved carbon dioxide. The presence of dissolved
nitrogen allows smaller bubbles to be formed with consequent greater
creaminess of the subsequent head. This is because the smaller bubbles need
a higher internal pressure to balance the greater surface tension, which is
inversely proportional to the radius of the bubbles. Achieving this higher
pressure is not possible just with dissolved carbon dioxide because the much
greater solubility of this gas compared to nitrogen would create an
unacceptably large head. When the can is opened, the pressure in the can
drops, causing the pressurised gas and beer inside the widget to jet out
from the hole. This agitation on the surrounding beer causes a chain
reaction of bubble formation throughout the beer. The result, when the can
is then poured out, is a surging mixture in the glass of very small gas
bubbles and liquid, just as is the case with certain types of draught beer such as draught stouts. In the case of these draught beers, which also contain before dispensing a
mixture of dissolved nitrogen and carbon dioxide, the agitation is caused by
forcing the beer under pressure through small holes in a restrictor in the
tap. The surging mixture gradually settles to produce a very creamy head.
The original widget was patented in the UK by Guinness.

The word "widget" as applied to this device is a trademark of the Guinness
brewery.

Background

Draught Guinness as it is known today was first produced in 1964. With
Guinness keen to produce Draught in package for consumers to drink at home,
Bottled Draught Guinness was formulated in 1978 and launched into the Irish
market in 1979. It was never actively marketed internationally as it
required an initiator which looked rather like a syringe to make it work.

Development

The initial inventors of generating draught Guinness from cans or bottles by
means of a sudden gas discharge from an internal compartment when the can or
bottle is opened were Tony Carey and Sammy Hildebrand, brewers with Guinness
in Dublin, in 1968. This invention was patented by them in British Patent No
1266351, filed 1969-01-27, complete specification published 1972-03-08. Development work on a can system under Project ACORN focused on an arrangement whereby a false lid underneath the main lid formed the gas chamber. Technical difficulties led to a
decision to put the can route on hold and concentrate on bottles using
external initiators. Subsequently, Guinness allowed this patent to lapse and
it was not until Ernest Saunders centralised R & D in 1984 that work
re-started on this invention under the direction of Alan Forage.

The design of an internal compartment that could be readily inserted during
the canning process was devised by Alan Forage and William Byrne, and work
started on the widget during the period 1984/85. The plan was to introduce a
plastic capsule into the can, pressurise it during the filling process and
then allow it to release this pressure in a controlled manner when the can
was being opened. This would be sufficient to initiate the product and give
it the characteristic creamy head. However, it was pointed out by Tony Carey
that this resulted in beer being forced into the ‘widget’ during
pasteurisation with consequent very poor head quality. He suggested
overcoming this by rapidly inverting the can after the lid was seamed on.
This extra innovation was successful.

It is important that oxygen is eliminated from any process developed as this can cause flavour deterioration when present.

The first samples sent to Dublin were labelled "Project Dynamite", which
caused some delay before customs and excise would release the samples.
Because of this the name was changed to Oaktree. Another name that changed
was ‘inserts’ – the operators called them widgets almost immediately after
they arrived on site – a name that has now stuck with the industry.

The development of ideas continued. In fact over 100 alternatives were
considered. The blow moulded widget was to be pierced with a laser and a
blower was then necessary to blow away the plume created by the laser
burning through the polypropylene. This was abandoned and instead it was
decided to gas exchange air for nitrogen on the filler, and produce the
inserts with a hole in place using straight forward and cheaper injection
moulding techniques.

Commissioning began January 1988, with a national launch date of March 1989.

This first generation widget was a plastic disk held by friction in the
bottom of the can. This method worked fine if the beer was served cold; when
served warm the can would overflow when opened. The floating widget, which
was launched in 1997, does not have this problem.

http://en.wikipedia.org/wiki/Widget_(beer)

St Leonards Church – Speeton Yorkshire

St Leonards Church – Speeton Yorkshire

Some cool moulding services images:

St Leonards Church – Speeton Yorkshire
moulding services
Image by nick.garrod
Artizen HDR Lock05

The church of St. Leonard’s at Speeton, which is one of the smallest complete parish churches in Yorkshire, was erected in the early Norman period, not later than 1100. It was probably built on the site of an earlier Saxon church dating from the first days of Christianity in Yorkshire.
After the Norman Conquest of 1066, the lands of Speeton were bestowed, by various owners, on the Augustinian Priory at Bridlington. Eventually almost the whole of the present parish formed part of the Priories’ estates. Speeton church depended upon Bridlington churchmen for religious administration» In 1290, Edward I granted the prior and canons free warren over many manors including Speeton. A parochial chaplain is first mentioned in 1451. The gift of so much land is evidence of a great religious devotion on the part of many previous residents of the village. The church is dedicated to St. Leonard, who lived in the sixth century and became the patron saint of prisoners and captives. He ministered to slaves and prisoners in an age when the threat of such a fate hung over everyone. His feast day is November 6th.

Speeton church seems to have had a peaceful existence until the reign of Henry VIII and the Dissolution of the Monasteries. During the Reformation, the churches frescoe of the Crucifixion, stone altar, vestments, votive lights and probably a statue of St. Leonard himself were all removed. After the Reformation, Robert Denison became the proprietor of Speeton, his family remaining patrons until Lord Londesborough sold his lands earlier this century. The Chantry of St. Leonard in Speeton Chapel had owned land in other parishes, e.g. Harpham, before the Reformation. The ‘Chapel of Speeton’ was mentioned in the Parliamentary survey of 1650. It had tithes worth £50 p.a. which were the property of Sir Michael Wharton. The chaplain’s salary is recorded as £3. 12s. Od. (£3.60) per annum. At this time the preaching minister was one Richard Broderick, a puritan, who also preached at Bempton. This connection with Bempton church was to continue until 1919, when Speeton was merged with Reighton to form a "United Benefice."

In the eighteenth century big box pews and a three decker pulpit were provided, while the font was moved into the chancel. As with most small churches of the period, the curates were absentees. In the years 1743 to 1764 the curate lived at Hunmanby but this was much closer at hand than was the case with most absentee curates. During the seventeenth and eighteenth centuries the incumbents at Flamborough and Bempton often conducted services at Speeton. The fact that the church was often empty at this time has led to the belief that it may have been used by smugglers to store their takings before distribution. Only one service was held every six weeks in 1743.

In the nineteenth century the church must have presented a somewhat run-down appearance. A visit by the local topographer Reverend Prickett, led him to report in 1831 that, "Speeton Chapel is only an oblong room." The east end of the church was being used as a school. The church was probably the one visited by Charlotte Bronte in 1852, when she tells that, "It was certainly not more than thrice the length of our passage, floored with brick, the walls green with mould, the pews painted white, but the paint almost worn off with time and decay." She also recorded the humourous situation of the choir facing away from the congregation.
Reverend George Alcock, who wrote the history of Speeton Parish and Church in 1936 spoke with many people who remembered the church in the latter half of Victoria’s reign. The box pews were occupied by farm labourers from the 1860’s until much later, while other pews came to be regarded as belonging to certain farmers and their tenants. Reverend Alcock records, however, that Speeton never indulged in the sin of charging pew rents.

During the period 1865-70 the chancel was used, once again, as a school. The average daily attendance in 1865 was twelve. In this year the Minister stated that "nearly all the inhabitants attented both church and chapel." Some attended on alternate Sundays which perhaps explains the co-operation between the religious houses concerning the harmonium, which was used at the church for one service and then moved to the chapel for the next. This seems to have become an established tradition by the early years of this century.

The lack of burial ground meant that coffins were often carried by the pall bearers to Bridlington Priory. It was customary for the bearers to refresh themselves at the Nags Head near the Priory, at the end of their arduous journey and if time allowed, to call there again before starting back to the village. This custom continued to almost within living memory and a well worn track once existed to mark the funeral route. When the railway was constructed, a new road was built and the old track gradually fell into disuse.

In the later years of the nineteenth century, continuing into Edwardian times, the farmers occupying the three neighbouring farms made themselves responsible for the churches upkeep. This system, which worked in rotation, was so successful that collections for church expenses were unknown before 1906.
The dilapidated condition of the church remained a problem, however with plaster falling from the roof, even during services. Reverend John Wilkinson Vicar of Bempton and Speeton in 1905-14 undertook to restore the building. A bazaar was held at Millholm Farm, a new organ was bought, the box pews, pulpit and plaster ceiling were removed. Smaller pine pews were built and erected on the spot. The new pulpit was part of a stall given to St. Mary’s Bridlington by Mrs. Greenwood Clayton. The tiles were replaced by a brick floor and two lancet windows were made in the west wall on either side of the tower. The font was moved from the chancel to the west end and an altar cross set up on the altar. Most of this occurred in 1911.

Cool Precision Tooling Made In China images

Cool Precision Tooling Made In China images

A few nice precision tooling made in china images I found:

Steven F. Udvar-Hazy Center: Monnett Moni stunt plane, hanging over the B-29 Enola Gay
precision tooling made in china
Image by Chris Devers
Quoting Smithsonian National Air and Space Museum | Monnett Moni:

Schoolteacher John Monnett designed the Moni (mo-nee) during the early 1980s, and then coined the term ‘air recreation vehicle’ to describe this airplane. Monnett’s design almost captured all the merits that so many leisure pilots longed to find in one aircraft. The Moni looked great just sitting on the ramp. It performed well, and someone reasonably handy with average shop tools could construct one in their own garage. The design had much going for it, but like so many homebuilt aircraft before and since, a few key engineering lapses in the design, plus problems with the engine and propeller, relegated the Moni to the category of homebuilt aircraft that promise much in design but fail to deliver. Harold C. Weston generously donated his Moni to the National Air and Space Museum in April 1992. Weston built the airplane himself and flew it more than 40 hours.

Gift of Harold C. Weston.

Designer:
John Monnett

Manufacturer:
Harold Weston

Country of Origin:
United States of America

Dimensions:
Wingspan: 8.4 m (27 ft 6 in)
Length: 4.5 m (14 ft 7.5. in)
Height: 0.7 m (28 in)
Weights: Gross, 227 kg (500 lb)
Empty, 118 kg (260 lb)
Engine: KFM 107E, two-cylinder, two-stroke air-cooled, 25 horsepower

Materials:
Overall – Aluminum airframe, semi-monocoque construction.

Physical Description:
Low-wing, vee-tail motorglider, beige with purple, red, and orange trim; single-seat aircraft built from parts sent to builder by mail-order kit; mounted on roadable trailer with wings detached (A19940029000).

This is the firebox of my Bourry box wood kiln.1

This is the firebox of my Bourry box wood kiln.1

Check out these china once used mould images:

This is the firebox of my Bourry box wood kiln.1
china once used mould
Image by Jim Surkamp
Pots Thru Time With Joy Bridy – This is local clay dug up from around the foundation of my house and I’m going to process it in this old bath tub, and before I process it, I break it up in little pieces and screen it through some hardware cloth, which helps to get any stones, weeds, detritus out of it. This clay does not have high plasticity which means it is a little harder to work with. plasticity definition: Capable of being formed into a shape or moulded without cracking. It might break and crack as I work with it, but that’s probably what I like about it. It adds character, instead of plasticity. It’s also reddish brown stoneware, not real white like a porcelain and not super iron-rich. It won’t be black sort of an orangish color when it’s fired. It will have some porousness. I fire it to a high enough temperature that it’s useful as functional ware as well as sculptural. This clay is also local clay and I’ll break it up into small marble-size pieces and slake it down in water in which I’ll run my hands through it for about ten or fifteen minutes (per) each bucket to get any rocks and stones and grass out. Then I’ll process this clay – once it’s wet – by drying it out slowly on top of bed sheets in the sun – so it’s a nice working consistancy. After I make the pieces I bisque fire them once. Then I’ll glaze and fire them in my wood kiln. (This is my wood kiln here). This is my wood kiln. I designed and built it five years ago. It’s a very old and traditional style and it’s fueled one hundred per cent with wood. I don’t know what the process would have been in the early eras of Weis pottery – if they would have used wood (They used wood and they used groundhog kilns). Ahh groundhog kilns are the type of kiln that I’m trained in. They tend to be long and flame-like, and very low and in the ground; and they fire for a similar amount of time as this kiln. When I fired this kiln, it fires for three days around the clock and Weis pottery would have done a very similar thing. Once you start a firing, you can’t leave it alone. You have to stay with it the whole time. Pots fill the chamber all the way up to the top, from the side wall, all the way up to the bagwall which you can see on the inside. The flame comes in from the fire box into the ware chamber, brings heat and ash and deposits- ash on the pots – leaves flame markings on the pots – then leaves through the exit flues into the chimney and straight up. My kiln reaches 2400 degrees, which is a high, (for) stoneware temperature. Traditionally, I think, kilns were fired a little cooler, probably 2000-2100 degrees. But wood can reach any temperature you would like depending on your combustion zone, your ware chamber, and your chimney. A fifth generation potter Davis P. Brown observed: “Speaking of firing, lots of people think red’s HOT. Red-hot ain’t even hot; when it’s HOT and you look in them, it’s like looking into the sun.” I use scrap wood. I use anything that doesn’t burn in the wood stove and anything that I would burn in a bonfire. So lots of limbs. The skinny limbs have the most minerals so you get the most interesting deposits and they allow for the most flexibility in gaining heat. And it’s all scrap. (I did some research, Joy, showing the data about the Weis’ pottery operation in 1850. And they reported that they spent seven hundred period dollars for a year’s work and they used six hundred cords of wood and a whole lot of lead. what does that signify to you, as a potter?). Six hundred cords of wood is a lot of wood! For me a cord of wood is eight foot by eight foot by four foot, and in a firing I go through maybe two cords of wood. With the groundhog style kiln, they were very inefficient. So they were stoking wood constantly and a lot of that fuel was leaving the kiln as smoke. Nowadays we know a little more on how to capture that fuel better. “A,” it tells me that we had a lot of wood in this area. Six hundred cords of wood is a huge amount of wood. And “B,” the lead is interesting because a lot of our local clays makes a really wonderful “slip,” that also makes a glaze on the inside of the pot. (A slip?) A slip is like a watered down clay. So a “paint” or a “glaze.” A lot of people use the terms back and forth. It would be what you would glaze with. So if they were using lead, it would be very bad for their health. They probably didn’t live long. and “B” it’s expensive. Even then it was expensive, but it was what people thought they needed to do. Nowadays we know that we can use all these natural things, and the styles that I work in are much more akin to what the Weis potters could have been doing in that I use a lot of local clays. I mix my glazes out of ashes and clay bodies. So I have a very low overhead compared to what they did in that I’m not buying any lead, I’m not buying any expensive colorants that they would have done. My studio is similar to the way they would work in that I have a closed system. My water comes from a rain barrel. I don’t have any running water. My kiln is fired with wood. I don’t fire a gas kiln which a lot of people do nowadays. And my clay is closed-cycle: whatever clay comes into my studio I keep recycling until it turns into pots. And, anything I don’t like I “slip” back down and make clay out of it again, which would have been a practice during their time. So everything stays within the studio. (So in many ways, you’re doing a traditional method that the Weises did, but with greater efficiency). It may have been an aesthetic choice for them in that they chose to do specifically what they were doing. As it is now, I could use a very expensive overhead, using porcelain from China and Europe and using glazes that I buy pre-mixed that have expensive rare earth elements in them. But I prefer the more elementary approach in that I like using clay. I like the variables that come into play with wood firing, and with using ash glazes and with mixing a lot of my own ingredients. This my kiln. This is the firebox of my Bourry box wood kiln. It’s different from a groundhog style in that the groundhog style kilns would have been in the ground. You would have had to crawl to get in them. You would have entered only through the front through a very small opening and had to load everything while on your knees. This is the front. This is the fire box. This is where the fire starts. I load it through the ware chamber door which then gets bricked up with rows of bricks. This side is the firebox where the actual fire occurs, and it starts in the bottom. Once the fire hits about eleven hundred degrees, I can close up this door. (How long does that take Joy?) . It takes a day and a half. Then I can open the side-stoking doors on both sides and start stoking across the top, which allows me to reach a temperature of twenty-four hundred degrees inside the chamber. It’s hotter in the firebox, but that’s the chamber temperature. (What type of design is this called?) This is called a “bourry” box – B-O-U-R-R-Y. It’a an Australian design. What it does – it’s a very efficient, wood-burning kiln because the wood is burning up here and the coal bed is down below. Air comes in. It burns the wood, but then all the smoke and the waste products that would be going up the chimney burn off over the coal bed. So I get what we refer to as a “double burn cycle:” getting heat during the first burn of the wood and extra heat as the smoke and gasses burn off. So it’s very efficient. I get no smoke and no waste product in that way, and I use half as much wood that I would in a kiln of this size without the Bourry box fire. It’s a crossed-dressed kiln because the fire box is here and then everything goes up into the chamber and then back down across from the firebox. It’s more to the flame pattern. Groundhog kilns are often called updraft although they are kind of a hybrid, because if you imagine a flame-shaped kiln it’s also going uphill. So your firebox is down below and you’re stoking the wood, and then the kiln goes up and the chimney’s at the top. So it has a little different pull to it. The chimney is always the engine of the kiln. It’s always what’s pulling the heat and flame through the kiln. This is called “wedging” the clay and what it does is it increases plasticity, which means that as you’re working with it, it will stretch a little easier. It also removes air bubbles and makes it smoother to work with in general. Every piece I make has to go across the wedging board. (This is the process they would do back in the 1800s?). This is as old as it gets: with a heavy round wheel at the bottom and a small light round wheel at the top. It’s been done in every culture across the globe. My rims are probably thin compared to theirs (Weises), because I’m used to a more contemporary look and feel. Theirs probably would have been a little beefier, easier to grab, easier to use. (Somebody made the comment that they were like the fiesta ware of their period) um-hm. Yeh. That’s all they had. And they’re all remarkably similar no matter where you go, especially in the Appalachian foothills. If you did/do the kick wheel, you can’t be in a hurry. This would have been a relative of a classic crock form, which would have been useful in every kitchen across the county during the years the Weis family was in operation. It would have been their bread and butter literally. And their tools would have been extremely similar: a wooden stick, some kind of sponge. Something with a point just in case. And for decoration: a fingernail; everybody would have their decoration around here (side of crock), seems to have been some fingernail marks. We can do another one on the electric. This is starting to center the clay on the wheelhead, and before I can actually make the piece, the clay has to be in the center of the wheel completely. These are all different techniques that help make that happen. This is called wedging on the wheel, where I squeeze it up and then lean it back down, and it also helps to align the particles. I have a modern-day wheel here. This is an electric wheel, which is silent, which is really nice. I center the clay if it comes closer to the starting shape that I want. And the first thing that I do to actually throw the pot is called “opening.” I sink my thumbs into the middle and start to create the “inside” versus the “outside.” Now I’m setting the bottom. Without compressing the clay, you end up getting cracks and flaws in the bottom. Using the pressure of my fingers against the wheelhead, compressing the clay between the two makes for a strong, useful pot. Next, I’ll actually pull up the walls of the vessel. This is the part that looks fun – and IS fun. As the pot gets closer to the form that I want, I fine-tune it with different tools. All of them could have been used in any era. This a wooden rib, and, again, it compresses the clay particles. What I’m looking for is a wall that’s even – thin, but not too thin. I want it to be sturdy when it’s used, but not too heavy. So I dance in between thin versus sturdy. At this point where the wall feels good, that I start to think about the form. I find one of the most important parts is the rim. It has to look good, but it also has to be compressed, because it is very common to bang it on a kitchen sink and it would chip if it wasn’t compressed very well. So it’s important to spend a little extra time, making sure that functional pots actually work. (Is that maybe why the Weises had kind of a strong lip?) Yes. A little extra clay at the foot, because that’s also a spot. I’m lucky enough to come out of the tradition of functional pottery throughout history, when I was in Pennsylvania I used to visit the groundhog kiln sites there. What became of the Wise family? Wrote Mary Bedinger Mitchell of her early years in Shepherdstown in the 1850s: “The town was thriving. There was a brick kiln and a very interesting primitive manufactory of the glazed crocks or earthen pots so much in use. It was carried on by an old man in the old house and had quite a medieval flavor.” After the Weis men would dig up and load the low-plasticity, red-burning clay on the outer bend in the Potomac nearby, they would bring it by wagon back to their worksite. To children like Mary the clay mill “was of absorbing interest, and they hoped for a ride on the long wooden shaft or tongue, to which the gentle horse was hitched along going round and round in a prescribed circle, as it patiently ground the clay into a fine smooth powder. A stone burr working on the same principle as a flour mill did the work. Time progressed and tastes changed in favor of the blue glazed crocks and jugs and the Weis manufactory went into a long, slow decline through the rest of the 19th century, the family finally selling their home to George Beltzhoover. Ever faithful at St. Peter’s Lutheran Church, William Weis’ burial site was graced with a stunning urn – so stunning that vandals threatened it. So, today the urn and Weis’ pots bear witness on a secure shelf at St. Peters, just as others bear witness at the Shepherdstown Historic museum, The County Visitors Center, the Jefferson County Museum, and there is the effort to preserve their memory by Pam and Ren Parziale. To this their traditional skills are also kept fresh by Joy Bridy in her modern pottery, but also keeping the ways of the Weises close at hand, literally.

Thanks to Joy Bridy at joybridy.com

Made possible with the generous, community-minded support of American Public University System (apus.edu)

Researched, written, produced by Jim Surkamp.

Primary References:

Weis Pots courtesy St. Peter’s Lutheran Church, Shepherdstown, WV; Jefferson County Museum, Charles Town, WV; and Historic Shepherdstown Museum.
wikiclay.com
heat-work.blogspot.com
ceramica.wikia.com
wvculture.org
wikipedia.org
nlm.nih.gov
studiopottery.com
wvgeohistory.org

Barber, E. A. (1893). “The Pottery and Porcelain of the United States.” New York, NY: G.P. Putnam’s & Sons.

Bourry, Emile; Wilton P. Rix. (1901). ”Treatise on Ceramic Industries: A Complete Manual for Pottery, Tile and Brick Works.” London, UK: Scott & Greenwood & Co.

POTTERY-EARTHENWARE-KILN-TOOLS
Encyclopédie, ou dictionnaire raisonné des sciences, des arts et des métiers (Encyclopaedia, or a Systematic Dictionary of the Sciences, Arts, and Crafts). 1751. edited by Denis Diderot and Jean le Rond d’Alembert Paris, Fr: André le Breton, publisher.

Kenamond, A. D. (1963). “Prominent Men of Shepherdstown, 1762-1962.” Charles Town, WV: Jefferson County Historical Society.

Mitchell, Mary B. “Memories.” edited by Nina Mitchell. Shepherd University Library.

Moler, Mrs. M. S. R.(1940). “George Weis and His Pottery.” Magazine of the Jefferson County Historical Society Vol. 6. pp.16-17.

Morton, Clyde D. (1987). “The Weis Pottery and the Genealogy of the Potters.” Magazine of the Jefferson County Historical Society Vol. 52. pp. 48-55.

Parziale, Reynolds and Pamela. (1981). “Pottery in the 1800s. The Weis Pottery, Shepherdstown, West Virginia.” Magazine of the Jefferson County Historical Society Vol. 47. pp. 23-29.

Rice, A. H.; John Baer Stoudt. (1929). “The Shenandoah Pottery.” Strasburg, VA: Shenandoah Publishing House, Inc.

Sanderson, Robert; Coll Monigue. (2000). “Wood-fired Ceramics: Contemporary Practices.” Philadelphia, PA: University of Pennsylvania Press. pp. 10-14.

Sweezy, Nancy. (1994). “Raised in Clay: The Southern Pottery Tradition.” Chapel Hill, NC: University of North Carolina Press.

Timbrell, John. (2005). “The Poison Paradox: Chemicals as Friends and Foes.” Oxford, UK: Oxford University Press. Print.

Weaver, Emma. (1967). “Artisans of the Appalachians.” Photos by Edward L. Dupuy. Asheville, North Carolina: Miller Printing Co.

1860 U.S. Federal Census – Population – National Archive and Records Administration (NARA).

What became of the Wise family?
china once used mould
Image by Jim Surkamp
Pots Thru Time With Joy Bridy – This is local clay dug up from around the foundation of my house and I’m going to process it in this old bath tub, and before I process it, I break it up in little pieces and screen it through some hardware cloth, which helps to get any stones, weeds, detritus out of it. This clay does not have high plasticity which means it is a little harder to work with. plasticity definition: Capable of being formed into a shape or moulded without cracking. It might break and crack as I work with it, but that’s probably what I like about it. It adds character, instead of plasticity. It’s also reddish brown stoneware, not real white like a porcelain and not super iron-rich. It won’t be black sort of an orangish color when it’s fired. It will have some porousness. I fire it to a high enough temperature that it’s useful as functional ware as well as sculptural. This clay is also local clay and I’ll break it up into small marble-size pieces and slake it down in water in which I’ll run my hands through it for about ten or fifteen minutes (per) each bucket to get any rocks and stones and grass out. Then I’ll process this clay – once it’s wet – by drying it out slowly on top of bed sheets in the sun – so it’s a nice working consistancy. After I make the pieces I bisque fire them once. Then I’ll glaze and fire them in my wood kiln. (This is my wood kiln here). This is my wood kiln. I designed and built it five years ago. It’s a very old and traditional style and it’s fueled one hundred per cent with wood. I don’t know what the process would have been in the early eras of Weis pottery – if they would have used wood (They used wood and they used groundhog kilns). Ahh groundhog kilns are the type of kiln that I’m trained in. They tend to be long and flame-like, and very low and in the ground; and they fire for a similar amount of time as this kiln. When I fired this kiln, it fires for three days around the clock and Weis pottery would have done a very similar thing. Once you start a firing, you can’t leave it alone. You have to stay with it the whole time. Pots fill the chamber all the way up to the top, from the side wall, all the way up to the bagwall which you can see on the inside. The flame comes in from the fire box into the ware chamber, brings heat and ash and deposits- ash on the pots – leaves flame markings on the pots – then leaves through the exit flues into the chimney and straight up. My kiln reaches 2400 degrees, which is a high, (for) stoneware temperature. Traditionally, I think, kilns were fired a little cooler, probably 2000-2100 degrees. But wood can reach any temperature you would like depending on your combustion zone, your ware chamber, and your chimney. A fifth generation potter Davis P. Brown observed: “Speaking of firing, lots of people think red’s HOT. Red-hot ain’t even hot; when it’s HOT and you look in them, it’s like looking into the sun.” I use scrap wood. I use anything that doesn’t burn in the wood stove and anything that I would burn in a bonfire. So lots of limbs. The skinny limbs have the most minerals so you get the most interesting deposits and they allow for the most flexibility in gaining heat. And it’s all scrap. (I did some research, Joy, showing the data about the Weis’ pottery operation in 1850. And they reported that they spent seven hundred period dollars for a year’s work and they used six hundred cords of wood and a whole lot of lead. what does that signify to you, as a potter?). Six hundred cords of wood is a lot of wood! For me a cord of wood is eight foot by eight foot by four foot, and in a firing I go through maybe two cords of wood. With the groundhog style kiln, they were very inefficient. So they were stoking wood constantly and a lot of that fuel was leaving the kiln as smoke. Nowadays we know a little more on how to capture that fuel better. “A,” it tells me that we had a lot of wood in this area. Six hundred cords of wood is a huge amount of wood. And “B,” the lead is interesting because a lot of our local clays makes a really wonderful “slip,” that also makes a glaze on the inside of the pot. (A slip?) A slip is like a watered down clay. So a “paint” or a “glaze.” A lot of people use the terms back and forth. It would be what you would glaze with. So if they were using lead, it would be very bad for their health. They probably didn’t live long. and “B” it’s expensive. Even then it was expensive, but it was what people thought they needed to do. Nowadays we know that we can use all these natural things, and the styles that I work in are much more akin to what the Weis potters could have been doing in that I use a lot of local clays. I mix my glazes out of ashes and clay bodies. So I have a very low overhead compared to what they did in that I’m not buying any lead, I’m not buying any expensive colorants that they would have done. My studio is similar to the way they would work in that I have a closed system. My water comes from a rain barrel. I don’t have any running water. My kiln is fired with wood. I don’t fire a gas kiln which a lot of people do nowadays. And my clay is closed-cycle: whatever clay comes into my studio I keep recycling until it turns into pots. And, anything I don’t like I “slip” back down and make clay out of it again, which would have been a practice during their time. So everything stays within the studio. (So in many ways, you’re doing a traditional method that the Weises did, but with greater efficiency). It may have been an aesthetic choice for them in that they chose to do specifically what they were doing. As it is now, I could use a very expensive overhead, using porcelain from China and Europe and using glazes that I buy pre-mixed that have expensive rare earth elements in them. But I prefer the more elementary approach in that I like using clay. I like the variables that come into play with wood firing, and with using ash glazes and with mixing a lot of my own ingredients. This my kiln. This is the firebox of my Bourry box wood kiln. It’s different from a groundhog style in that the groundhog style kilns would have been in the ground. You would have had to crawl to get in them. You would have entered only through the front through a very small opening and had to load everything while on your knees. This is the front. This is the fire box. This is where the fire starts. I load it through the ware chamber door which then gets bricked up with rows of bricks. This side is the firebox where the actual fire occurs, and it starts in the bottom. Once the fire hits about eleven hundred degrees, I can close up this door. (How long does that take Joy?) . It takes a day and a half. Then I can open the side-stoking doors on both sides and start stoking across the top, which allows me to reach a temperature of twenty-four hundred degrees inside the chamber. It’s hotter in the firebox, but that’s the chamber temperature. (What type of design is this called?) This is called a “bourry” box – B-O-U-R-R-Y. It’a an Australian design. What it does – it’s a very efficient, wood-burning kiln because the wood is burning up here and the coal bed is down below. Air comes in. It burns the wood, but then all the smoke and the waste products that would be going up the chimney burn off over the coal bed. So I get what we refer to as a “double burn cycle:” getting heat during the first burn of the wood and extra heat as the smoke and gasses burn off. So it’s very efficient. I get no smoke and no waste product in that way, and I use half as much wood that I would in a kiln of this size without the Bourry box fire. It’s a crossed-dressed kiln because the fire box is here and then everything goes up into the chamber and then back down across from the firebox. It’s more to the flame pattern. Groundhog kilns are often called updraft although they are kind of a hybrid, because if you imagine a flame-shaped kiln it’s also going uphill. So your firebox is down below and you’re stoking the wood, and then the kiln goes up and the chimney’s at the top. So it has a little different pull to it. The chimney is always the engine of the kiln. It’s always what’s pulling the heat and flame through the kiln. This is called “wedging” the clay and what it does is it increases plasticity, which means that as you’re working with it, it will stretch a little easier. It also removes air bubbles and makes it smoother to work with in general. Every piece I make has to go across the wedging board. (This is the process they would do back in the 1800s?). This is as old as it gets: with a heavy round wheel at the bottom and a small light round wheel at the top. It’s been done in every culture across the globe. My rims are probably thin compared to theirs (Weises), because I’m used to a more contemporary look and feel. Theirs probably would have been a little beefier, easier to grab, easier to use. (Somebody made the comment that they were like the fiesta ware of their period) um-hm. Yeh. That’s all they had. And they’re all remarkably similar no matter where you go, especially in the Appalachian foothills. If you did/do the kick wheel, you can’t be in a hurry. This would have been a relative of a classic crock form, which would have been useful in every kitchen across the county during the years the Weis family was in operation. It would have been their bread and butter literally. And their tools would have been extremely similar: a wooden stick, some kind of sponge. Something with a point just in case. And for decoration: a fingernail; everybody would have their decoration around here (side of crock), seems to have been some fingernail marks. We can do another one on the electric. This is starting to center the clay on the wheelhead, and before I can actually make the piece, the clay has to be in the center of the wheel completely. These are all different techniques that help make that happen. This is called wedging on the wheel, where I squeeze it up and then lean it back down, and it also helps to align the particles. I have a modern-day wheel here. This is an electric wheel, which is silent, which is really nice. I center the clay if it comes closer to the starting shape that I want. And the first thing that I do to actually throw the pot is called “opening.” I sink my thumbs into the middle and start to create the “inside” versus the “outside.” Now I’m setting the bottom. Without compressing the clay, you end up getting cracks and flaws in the bottom. Using the pressure of my fingers against the wheelhead, compressing the clay between the two makes for a strong, useful pot. Next, I’ll actually pull up the walls of the vessel. This is the part that looks fun – and IS fun. As the pot gets closer to the form that I want, I fine-tune it with different tools. All of them could have been used in any era. This a wooden rib, and, again, it compresses the clay particles. What I’m looking for is a wall that’s even – thin, but not too thin. I want it to be sturdy when it’s used, but not too heavy. So I dance in between thin versus sturdy. At this point where the wall feels good, that I start to think about the form. I find one of the most important parts is the rim. It has to look good, but it also has to be compressed, because it is very common to bang it on a kitchen sink and it would chip if it wasn’t compressed very well. So it’s important to spend a little extra time, making sure that functional pots actually work. (Is that maybe why the Weises had kind of a strong lip?) Yes. A little extra clay at the foot, because that’s also a spot. I’m lucky enough to come out of the tradition of functional pottery throughout history, when I was in Pennsylvania I used to visit the groundhog kiln sites there. What became of the Wise family? Wrote Mary Bedinger Mitchell of her early years in Shepherdstown in the 1850s: “The town was thriving. There was a brick kiln and a very interesting primitive manufactory of the glazed crocks or earthen pots so much in use. It was carried on by an old man in the old house and had quite a medieval flavor.” After the Weis men would dig up and load the low-plasticity, red-burning clay on the outer bend in the Potomac nearby, they would bring it by wagon back to their worksite. To children like Mary the clay mill “was of absorbing interest, and they hoped for a ride on the long wooden shaft or tongue, to which the gentle horse was hitched along going round and round in a prescribed circle, as it patiently ground the clay into a fine smooth powder. A stone burr working on the same principle as a flour mill did the work. Time progressed and tastes changed in favor of the blue glazed crocks and jugs and the Weis manufactory went into a long, slow decline through the rest of the 19th century, the family finally selling their home to George Beltzhoover. Ever faithful at St. Peter’s Lutheran Church, William Weis’ burial site was graced with a stunning urn – so stunning that vandals threatened it. So, today the urn and Weis’ pots bear witness on a secure shelf at St. Peters, just as others bear witness at the Shepherdstown Historic museum, The County Visitors Center, the Jefferson County Museum, and there is the effort to preserve their memory by Pam and Ren Parziale. To this their traditional skills are also kept fresh by Joy Bridy in her modern pottery, but also keeping the ways of the Weises close at hand, literally.

Thanks to Joy Bridy at joybridy.com

Made possible with the generous, community-minded support of American Public University System (apus.edu)

Researched, written, produced by Jim Surkamp.

Primary References:

Weis Pots courtesy St. Peter’s Lutheran Church, Shepherdstown, WV; Jefferson County Museum, Charles Town, WV; and Historic Shepherdstown Museum.
wikiclay.com
heat-work.blogspot.com
ceramica.wikia.com
wvculture.org
wikipedia.org
nlm.nih.gov
studiopottery.com
wvgeohistory.org

Barber, E. A. (1893). “The Pottery and Porcelain of the United States.” New York, NY: G.P. Putnam’s & Sons.

Bourry, Emile; Wilton P. Rix. (1901). ”Treatise on Ceramic Industries: A Complete Manual for Pottery, Tile and Brick Works.” London, UK: Scott & Greenwood & Co.

POTTERY-EARTHENWARE-KILN-TOOLS
Encyclopédie, ou dictionnaire raisonné des sciences, des arts et des métiers (Encyclopaedia, or a Systematic Dictionary of the Sciences, Arts, and Crafts). 1751. edited by Denis Diderot and Jean le Rond d’Alembert Paris, Fr: André le Breton, publisher.

Kenamond, A. D. (1963). “Prominent Men of Shepherdstown, 1762-1962.” Charles Town, WV: Jefferson County Historical Society.

Mitchell, Mary B. “Memories.” edited by Nina Mitchell. Shepherd University Library.

Moler, Mrs. M. S. R.(1940). “George Weis and His Pottery.” Magazine of the Jefferson County Historical Society Vol. 6. pp.16-17.

Morton, Clyde D. (1987). “The Weis Pottery and the Genealogy of the Potters.” Magazine of the Jefferson County Historical Society Vol. 52. pp. 48-55.

Parziale, Reynolds and Pamela. (1981). “Pottery in the 1800s. The Weis Pottery, Shepherdstown, West Virginia.” Magazine of the Jefferson County Historical Society Vol. 47. pp. 23-29.

Rice, A. H.; John Baer Stoudt. (1929). “The Shenandoah Pottery.” Strasburg, VA: Shenandoah Publishing House, Inc.

Sanderson, Robert; Coll Monigue. (2000). “Wood-fired Ceramics: Contemporary Practices.” Philadelphia, PA: University of Pennsylvania Press. pp. 10-14.

Sweezy, Nancy. (1994). “Raised in Clay: The Southern Pottery Tradition.” Chapel Hill, NC: University of North Carolina Press.

Timbrell, John. (2005). “The Poison Paradox: Chemicals as Friends and Foes.” Oxford, UK: Oxford University Press. Print.

Weaver, Emma. (1967). “Artisans of the Appalachians.” Photos by Edward L. Dupuy. Asheville, North Carolina: Miller Printing Co.

1860 U.S. Federal Census – Population – National Archive and Records Administration (NARA).

My rims are probably thin compared to theirs (Weises)
china once used mould
Image by Jim Surkamp
Pots Thru Time With Joy Bridy – This is local clay dug up from around the foundation of my house and I’m going to process it in this old bath tub, and before I process it, I break it up in little pieces and screen it through some hardware cloth, which helps to get any stones, weeds, detritus out of it. This clay does not have high plasticity which means it is a little harder to work with. plasticity definition: Capable of being formed into a shape or moulded without cracking. It might break and crack as I work with it, but that’s probably what I like about it. It adds character, instead of plasticity. It’s also reddish brown stoneware, not real white like a porcelain and not super iron-rich. It won’t be black sort of an orangish color when it’s fired. It will have some porousness. I fire it to a high enough temperature that it’s useful as functional ware as well as sculptural. This clay is also local clay and I’ll break it up into small marble-size pieces and slake it down in water in which I’ll run my hands through it for about ten or fifteen minutes (per) each bucket to get any rocks and stones and grass out. Then I’ll process this clay – once it’s wet – by drying it out slowly on top of bed sheets in the sun – so it’s a nice working consistancy. After I make the pieces I bisque fire them once. Then I’ll glaze and fire them in my wood kiln. (This is my wood kiln here). This is my wood kiln. I designed and built it five years ago. It’s a very old and traditional style and it’s fueled one hundred per cent with wood. I don’t know what the process would have been in the early eras of Weis pottery – if they would have used wood (They used wood and they used groundhog kilns). Ahh groundhog kilns are the type of kiln that I’m trained in. They tend to be long and flame-like, and very low and in the ground; and they fire for a similar amount of time as this kiln. When I fired this kiln, it fires for three days around the clock and Weis pottery would have done a very similar thing. Once you start a firing, you can’t leave it alone. You have to stay with it the whole time. Pots fill the chamber all the way up to the top, from the side wall, all the way up to the bagwall which you can see on the inside. The flame comes in from the fire box into the ware chamber, brings heat and ash and deposits- ash on the pots – leaves flame markings on the pots – then leaves through the exit flues into the chimney and straight up. My kiln reaches 2400 degrees, which is a high, (for) stoneware temperature. Traditionally, I think, kilns were fired a little cooler, probably 2000-2100 degrees. But wood can reach any temperature you would like depending on your combustion zone, your ware chamber, and your chimney. A fifth generation potter Davis P. Brown observed: “Speaking of firing, lots of people think red’s HOT. Red-hot ain’t even hot; when it’s HOT and you look in them, it’s like looking into the sun.” I use scrap wood. I use anything that doesn’t burn in the wood stove and anything that I would burn in a bonfire. So lots of limbs. The skinny limbs have the most minerals so you get the most interesting deposits and they allow for the most flexibility in gaining heat. And it’s all scrap. (I did some research, Joy, showing the data about the Weis’ pottery operation in 1850. And they reported that they spent seven hundred period dollars for a year’s work and they used six hundred cords of wood and a whole lot of lead. what does that signify to you, as a potter?). Six hundred cords of wood is a lot of wood! For me a cord of wood is eight foot by eight foot by four foot, and in a firing I go through maybe two cords of wood. With the groundhog style kiln, they were very inefficient. So they were stoking wood constantly and a lot of that fuel was leaving the kiln as smoke. Nowadays we know a little more on how to capture that fuel better. “A,” it tells me that we had a lot of wood in this area. Six hundred cords of wood is a huge amount of wood. And “B,” the lead is interesting because a lot of our local clays makes a really wonderful “slip,” that also makes a glaze on the inside of the pot. (A slip?) A slip is like a watered down clay. So a “paint” or a “glaze.” A lot of people use the terms back and forth. It would be what you would glaze with. So if they were using lead, it would be very bad for their health. They probably didn’t live long. and “B” it’s expensive. Even then it was expensive, but it was what people thought they needed to do. Nowadays we know that we can use all these natural things, and the styles that I work in are much more akin to what the Weis potters could have been doing in that I use a lot of local clays. I mix my glazes out of ashes and clay bodies. So I have a very low overhead compared to what they did in that I’m not buying any lead, I’m not buying any expensive colorants that they would have done. My studio is similar to the way they would work in that I have a closed system. My water comes from a rain barrel. I don’t have any running water. My kiln is fired with wood. I don’t fire a gas kiln which a lot of people do nowadays. And my clay is closed-cycle: whatever clay comes into my studio I keep recycling until it turns into pots. And, anything I don’t like I “slip” back down and make clay out of it again, which would have been a practice during their time. So everything stays within the studio. (So in many ways, you’re doing a traditional method that the Weises did, but with greater efficiency). It may have been an aesthetic choice for them in that they chose to do specifically what they were doing. As it is now, I could use a very expensive overhead, using porcelain from China and Europe and using glazes that I buy pre-mixed that have expensive rare earth elements in them. But I prefer the more elementary approach in that I like using clay. I like the variables that come into play with wood firing, and with using ash glazes and with mixing a lot of my own ingredients. This my kiln. This is the firebox of my Bourry box wood kiln. It’s different from a groundhog style in that the groundhog style kilns would have been in the ground. You would have had to crawl to get in them. You would have entered only through the front through a very small opening and had to load everything while on your knees. This is the front. This is the fire box. This is where the fire starts. I load it through the ware chamber door which then gets bricked up with rows of bricks. This side is the firebox where the actual fire occurs, and it starts in the bottom. Once the fire hits about eleven hundred degrees, I can close up this door. (How long does that take Joy?) . It takes a day and a half. Then I can open the side-stoking doors on both sides and start stoking across the top, which allows me to reach a temperature of twenty-four hundred degrees inside the chamber. It’s hotter in the firebox, but that’s the chamber temperature. (What type of design is this called?) This is called a “bourry” box – B-O-U-R-R-Y. It’a an Australian design. What it does – it’s a very efficient, wood-burning kiln because the wood is burning up here and the coal bed is down below. Air comes in. It burns the wood, but then all the smoke and the waste products that would be going up the chimney burn off over the coal bed. So I get what we refer to as a “double burn cycle:” getting heat during the first burn of the wood and extra heat as the smoke and gasses burn off. So it’s very efficient. I get no smoke and no waste product in that way, and I use half as much wood that I would in a kiln of this size without the Bourry box fire. It’s a crossed-dressed kiln because the fire box is here and then everything goes up into the chamber and then back down across from the firebox. It’s more to the flame pattern. Groundhog kilns are often called updraft although they are kind of a hybrid, because if you imagine a flame-shaped kiln it’s also going uphill. So your firebox is down below and you’re stoking the wood, and then the kiln goes up and the chimney’s at the top. So it has a little different pull to it. The chimney is always the engine of the kiln. It’s always what’s pulling the heat and flame through the kiln. This is called “wedging” the clay and what it does is it increases plasticity, which means that as you’re working with it, it will stretch a little easier. It also removes air bubbles and makes it smoother to work with in general. Every piece I make has to go across the wedging board. (This is the process they would do back in the 1800s?). This is as old as it gets: with a heavy round wheel at the bottom and a small light round wheel at the top. It’s been done in every culture across the globe. My rims are probably thin compared to theirs (Weises), because I’m used to a more contemporary look and feel. Theirs probably would have been a little beefier, easier to grab, easier to use. (Somebody made the comment that they were like the fiesta ware of their period) um-hm. Yeh. That’s all they had. And they’re all remarkably similar no matter where you go, especially in the Appalachian foothills. If you did/do the kick wheel, you can’t be in a hurry. This would have been a relative of a classic crock form, which would have been useful in every kitchen across the county during the years the Weis family was in operation. It would have been their bread and butter literally. And their tools would have been extremely similar: a wooden stick, some kind of sponge. Something with a point just in case. And for decoration: a fingernail; everybody would have their decoration around here (side of crock), seems to have been some fingernail marks. We can do another one on the electric. This is starting to center the clay on the wheelhead, and before I can actually make the piece, the clay has to be in the center of the wheel completely. These are all different techniques that help make that happen. This is called wedging on the wheel, where I squeeze it up and then lean it back down, and it also helps to align the particles. I have a modern-day wheel here. This is an electric wheel, which is silent, which is really nice. I center the clay if it comes closer to the starting shape that I want. And the first thing that I do to actually throw the pot is called “opening.” I sink my thumbs into the middle and start to create the “inside” versus the “outside.” Now I’m setting the bottom. Without compressing the clay, you end up getting cracks and flaws in the bottom. Using the pressure of my fingers against the wheelhead, compressing the clay between the two makes for a strong, useful pot. Next, I’ll actually pull up the walls of the vessel. This is the part that looks fun – and IS fun. As the pot gets closer to the form that I want, I fine-tune it with different tools. All of them could have been used in any era. This a wooden rib, and, again, it compresses the clay particles. What I’m looking for is a wall that’s even – thin, but not too thin. I want it to be sturdy when it’s used, but not too heavy. So I dance in between thin versus sturdy. At this point where the wall feels good, that I start to think about the form. I find one of the most important parts is the rim. It has to look good, but it also has to be compressed, because it is very common to bang it on a kitchen sink and it would chip if it wasn’t compressed very well. So it’s important to spend a little extra time, making sure that functional pots actually work. (Is that maybe why the Weises had kind of a strong lip?) Yes. A little extra clay at the foot, because that’s also a spot. I’m lucky enough to come out of the tradition of functional pottery throughout history, when I was in Pennsylvania I used to visit the groundhog kiln sites there. What became of the Wise family? Wrote Mary Bedinger Mitchell of her early years in Shepherdstown in the 1850s: “The town was thriving. There was a brick kiln and a very interesting primitive manufactory of the glazed crocks or earthen pots so much in use. It was carried on by an old man in the old house and had quite a medieval flavor.” After the Weis men would dig up and load the low-plasticity, red-burning clay on the outer bend in the Potomac nearby, they would bring it by wagon back to their worksite. To children like Mary the clay mill “was of absorbing interest, and they hoped for a ride on the long wooden shaft or tongue, to which the gentle horse was hitched along going round and round in a prescribed circle, as it patiently ground the clay into a fine smooth powder. A stone burr working on the same principle as a flour mill did the work. Time progressed and tastes changed in favor of the blue glazed crocks and jugs and the Weis manufactory went into a long, slow decline through the rest of the 19th century, the family finally selling their home to George Beltzhoover. Ever faithful at St. Peter’s Lutheran Church, William Weis’ burial site was graced with a stunning urn – so stunning that vandals threatened it. So, today the urn and Weis’ pots bear witness on a secure shelf at St. Peters, just as others bear witness at the Shepherdstown Historic museum, The County Visitors Center, the Jefferson County Museum, and there is the effort to preserve their memory by Pam and Ren Parziale. To this their traditional skills are also kept fresh by Joy Bridy in her modern pottery, but also keeping the ways of the Weises close at hand, literally.

Thanks to Joy Bridy at joybridy.com

Made possible with the generous, community-minded support of American Public University System (apus.edu)

Researched, written, produced by Jim Surkamp.

Primary References:

Weis Pots courtesy St. Peter’s Lutheran Church, Shepherdstown, WV; Jefferson County Museum, Charles Town, WV; and Historic Shepherdstown Museum.
wikiclay.com
heat-work.blogspot.com
ceramica.wikia.com
wvculture.org
wikipedia.org
nlm.nih.gov
studiopottery.com
wvgeohistory.org

Barber, E. A. (1893). “The Pottery and Porcelain of the United States.” New York, NY: G.P. Putnam’s & Sons.

Bourry, Emile; Wilton P. Rix. (1901). ”Treatise on Ceramic Industries: A Complete Manual for Pottery, Tile and Brick Works.” London, UK: Scott & Greenwood & Co.

POTTERY-EARTHENWARE-KILN-TOOLS
Encyclopédie, ou dictionnaire raisonné des sciences, des arts et des métiers (Encyclopaedia, or a Systematic Dictionary of the Sciences, Arts, and Crafts). 1751. edited by Denis Diderot and Jean le Rond d’Alembert Paris, Fr: André le Breton, publisher.

Kenamond, A. D. (1963). “Prominent Men of Shepherdstown, 1762-1962.” Charles Town, WV: Jefferson County Historical Society.

Mitchell, Mary B. “Memories.” edited by Nina Mitchell. Shepherd University Library.

Moler, Mrs. M. S. R.(1940). “George Weis and His Pottery.” Magazine of the Jefferson County Historical Society Vol. 6. pp.16-17.

Morton, Clyde D. (1987). “The Weis Pottery and the Genealogy of the Potters.” Magazine of the Jefferson County Historical Society Vol. 52. pp. 48-55.

Parziale, Reynolds and Pamela. (1981). “Pottery in the 1800s. The Weis Pottery, Shepherdstown, West Virginia.” Magazine of the Jefferson County Historical Society Vol. 47. pp. 23-29.

Rice, A. H.; John Baer Stoudt. (1929). “The Shenandoah Pottery.” Strasburg, VA: Shenandoah Publishing House, Inc.

Sanderson, Robert; Coll Monigue. (2000). “Wood-fired Ceramics: Contemporary Practices.” Philadelphia, PA: University of Pennsylvania Press. pp. 10-14.

Sweezy, Nancy. (1994). “Raised in Clay: The Southern Pottery Tradition.” Chapel Hill, NC: University of North Carolina Press.

Timbrell, John. (2005). “The Poison Paradox: Chemicals as Friends and Foes.” Oxford, UK: Oxford University Press. Print.

Weaver, Emma. (1967). “Artisans of the Appalachians.” Photos by Edward L. Dupuy. Asheville, North Carolina: Miller Printing Co.

1860 U.S. Federal Census – Population – National Archive and Records Administration (NARA).