Some cool china once used mould images:
if they were using lead, it would be very bad for their health.
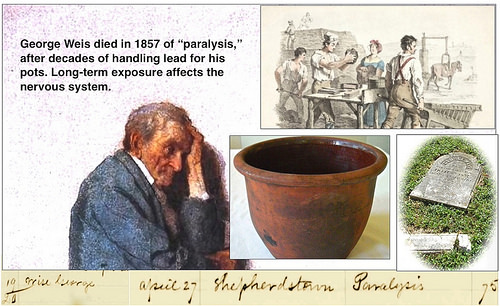
Image by Jim Surkamp
Pots Thru Time With Joy Bridy – This is local clay dug up from around the foundation of my house and I’m going to process it in this old bath tub, and before I process it, I break it up in little pieces and screen it through some hardware cloth, which helps to get any stones, weeds, detritus out of it. This clay does not have high plasticity which means it is a little harder to work with. plasticity definition: Capable of being formed into a shape or moulded without cracking. It might break and crack as I work with it, but that’s probably what I like about it. It adds character, instead of plasticity. It’s also reddish brown stoneware, not real white like a porcelain and not super iron-rich. It won’t be black sort of an orangish color when it’s fired. It will have some porousness. I fire it to a high enough temperature that it’s useful as functional ware as well as sculptural. This clay is also local clay and I’ll break it up into small marble-size pieces and slake it down in water in which I’ll run my hands through it for about ten or fifteen minutes (per) each bucket to get any rocks and stones and grass out. Then I’ll process this clay – once it’s wet – by drying it out slowly on top of bed sheets in the sun – so it’s a nice working consistancy. After I make the pieces I bisque fire them once. Then I’ll glaze and fire them in my wood kiln. (This is my wood kiln here). This is my wood kiln. I designed and built it five years ago. It’s a very old and traditional style and it’s fueled one hundred per cent with wood. I don’t know what the process would have been in the early eras of Weis pottery – if they would have used wood (They used wood and they used groundhog kilns). Ahh groundhog kilns are the type of kiln that I’m trained in. They tend to be long and flame-like, and very low and in the ground; and they fire for a similar amount of time as this kiln. When I fired this kiln, it fires for three days around the clock and Weis pottery would have done a very similar thing. Once you start a firing, you can’t leave it alone. You have to stay with it the whole time. Pots fill the chamber all the way up to the top, from the side wall, all the way up to the bagwall which you can see on the inside. The flame comes in from the fire box into the ware chamber, brings heat and ash and deposits- ash on the pots – leaves flame markings on the pots – then leaves through the exit flues into the chimney and straight up. My kiln reaches 2400 degrees, which is a high, (for) stoneware temperature. Traditionally, I think, kilns were fired a little cooler, probably 2000-2100 degrees. But wood can reach any temperature you would like depending on your combustion zone, your ware chamber, and your chimney. A fifth generation potter Davis P. Brown observed: “Speaking of firing, lots of people think red’s HOT. Red-hot ain’t even hot; when it’s HOT and you look in them, it’s like looking into the sun.” I use scrap wood. I use anything that doesn’t burn in the wood stove and anything that I would burn in a bonfire. So lots of limbs. The skinny limbs have the most minerals so you get the most interesting deposits and they allow for the most flexibility in gaining heat. And it’s all scrap. (I did some research, Joy, showing the data about the Weis’ pottery operation in 1850. And they reported that they spent seven hundred period dollars for a year’s work and they used six hundred cords of wood and a whole lot of lead. what does that signify to you, as a potter?). Six hundred cords of wood is a lot of wood! For me a cord of wood is eight foot by eight foot by four foot, and in a firing I go through maybe two cords of wood. With the groundhog style kiln, they were very inefficient. So they were stoking wood constantly and a lot of that fuel was leaving the kiln as smoke. Nowadays we know a little more on how to capture that fuel better. “A,” it tells me that we had a lot of wood in this area. Six hundred cords of wood is a huge amount of wood. And “B,” the lead is interesting because a lot of our local clays makes a really wonderful “slip,” that also makes a glaze on the inside of the pot. (A slip?) A slip is like a watered down clay. So a “paint” or a “glaze.” A lot of people use the terms back and forth. It would be what you would glaze with. So if they were using lead, it would be very bad for their health. They probably didn’t live long. and “B” it’s expensive. Even then it was expensive, but it was what people thought they needed to do. Nowadays we know that we can use all these natural things, and the styles that I work in are much more akin to what the Weis potters could have been doing in that I use a lot of local clays. I mix my glazes out of ashes and clay bodies. So I have a very low overhead compared to what they did in that I’m not buying any lead, I’m not buying any expensive colorants that they would have done. My studio is similar to the way they would work in that I have a closed system. My water comes from a rain barrel. I don’t have any running water. My kiln is fired with wood. I don’t fire a gas kiln which a lot of people do nowadays. And my clay is closed-cycle: whatever clay comes into my studio I keep recycling until it turns into pots. And, anything I don’t like I “slip” back down and make clay out of it again, which would have been a practice during their time. So everything stays within the studio. (So in many ways, you’re doing a traditional method that the Weises did, but with greater efficiency). It may have been an aesthetic choice for them in that they chose to do specifically what they were doing. As it is now, I could use a very expensive overhead, using porcelain from China and Europe and using glazes that I buy pre-mixed that have expensive rare earth elements in them. But I prefer the more elementary approach in that I like using clay. I like the variables that come into play with wood firing, and with using ash glazes and with mixing a lot of my own ingredients. This my kiln. This is the firebox of my Bourry box wood kiln. It’s different from a groundhog style in that the groundhog style kilns would have been in the ground. You would have had to crawl to get in them. You would have entered only through the front through a very small opening and had to load everything while on your knees. This is the front. This is the fire box. This is where the fire starts. I load it through the ware chamber door which then gets bricked up with rows of bricks. This side is the firebox where the actual fire occurs, and it starts in the bottom. Once the fire hits about eleven hundred degrees, I can close up this door. (How long does that take Joy?) . It takes a day and a half. Then I can open the side-stoking doors on both sides and start stoking across the top, which allows me to reach a temperature of twenty-four hundred degrees inside the chamber. It’s hotter in the firebox, but that’s the chamber temperature. (What type of design is this called?) This is called a “bourry” box – B-O-U-R-R-Y. It’a an Australian design. What it does – it’s a very efficient, wood-burning kiln because the wood is burning up here and the coal bed is down below. Air comes in. It burns the wood, but then all the smoke and the waste products that would be going up the chimney burn off over the coal bed. So I get what we refer to as a “double burn cycle:” getting heat during the first burn of the wood and extra heat as the smoke and gasses burn off. So it’s very efficient. I get no smoke and no waste product in that way, and I use half as much wood that I would in a kiln of this size without the Bourry box fire. It’s a crossed-dressed kiln because the fire box is here and then everything goes up into the chamber and then back down across from the firebox. It’s more to the flame pattern. Groundhog kilns are often called updraft although they are kind of a hybrid, because if you imagine a flame-shaped kiln it’s also going uphill. So your firebox is down below and you’re stoking the wood, and then the kiln goes up and the chimney’s at the top. So it has a little different pull to it. The chimney is always the engine of the kiln. It’s always what’s pulling the heat and flame through the kiln. This is called “wedging” the clay and what it does is it increases plasticity, which means that as you’re working with it, it will stretch a little easier. It also removes air bubbles and makes it smoother to work with in general. Every piece I make has to go across the wedging board. (This is the process they would do back in the 1800s?). This is as old as it gets: with a heavy round wheel at the bottom and a small light round wheel at the top. It’s been done in every culture across the globe. My rims are probably thin compared to theirs (Weises), because I’m used to a more contemporary look and feel. Theirs probably would have been a little beefier, easier to grab, easier to use. (Somebody made the comment that they were like the fiesta ware of their period) um-hm. Yeh. That’s all they had. And they’re all remarkably similar no matter where you go, especially in the Appalachian foothills. If you did/do the kick wheel, you can’t be in a hurry. This would have been a relative of a classic crock form, which would have been useful in every kitchen across the county during the years the Weis family was in operation. It would have been their bread and butter literally. And their tools would have been extremely similar: a wooden stick, some kind of sponge. Something with a point just in case. And for decoration: a fingernail; everybody would have their decoration around here (side of crock), seems to have been some fingernail marks. We can do another one on the electric. This is starting to center the clay on the wheelhead, and before I can actually make the piece, the clay has to be in the center of the wheel completely. These are all different techniques that help make that happen. This is called wedging on the wheel, where I squeeze it up and then lean it back down, and it also helps to align the particles. I have a modern-day wheel here. This is an electric wheel, which is silent, which is really nice. I center the clay if it comes closer to the starting shape that I want. And the first thing that I do to actually throw the pot is called “opening.” I sink my thumbs into the middle and start to create the “inside” versus the “outside.” Now I’m setting the bottom. Without compressing the clay, you end up getting cracks and flaws in the bottom. Using the pressure of my fingers against the wheelhead, compressing the clay between the two makes for a strong, useful pot. Next, I’ll actually pull up the walls of the vessel. This is the part that looks fun – and IS fun. As the pot gets closer to the form that I want, I fine-tune it with different tools. All of them could have been used in any era. This a wooden rib, and, again, it compresses the clay particles. What I’m looking for is a wall that’s even – thin, but not too thin. I want it to be sturdy when it’s used, but not too heavy. So I dance in between thin versus sturdy. At this point where the wall feels good, that I start to think about the form. I find one of the most important parts is the rim. It has to look good, but it also has to be compressed, because it is very common to bang it on a kitchen sink and it would chip if it wasn’t compressed very well. So it’s important to spend a little extra time, making sure that functional pots actually work. (Is that maybe why the Weises had kind of a strong lip?) Yes. A little extra clay at the foot, because that’s also a spot. I’m lucky enough to come out of the tradition of functional pottery throughout history, when I was in Pennsylvania I used to visit the groundhog kiln sites there. What became of the Wise family? Wrote Mary Bedinger Mitchell of her early years in Shepherdstown in the 1850s: “The town was thriving. There was a brick kiln and a very interesting primitive manufactory of the glazed crocks or earthen pots so much in use. It was carried on by an old man in the old house and had quite a medieval flavor.” After the Weis men would dig up and load the low-plasticity, red-burning clay on the outer bend in the Potomac nearby, they would bring it by wagon back to their worksite. To children like Mary the clay mill “was of absorbing interest, and they hoped for a ride on the long wooden shaft or tongue, to which the gentle horse was hitched along going round and round in a prescribed circle, as it patiently ground the clay into a fine smooth powder. A stone burr working on the same principle as a flour mill did the work. Time progressed and tastes changed in favor of the blue glazed crocks and jugs and the Weis manufactory went into a long, slow decline through the rest of the 19th century, the family finally selling their home to George Beltzhoover. Ever faithful at St. Peter’s Lutheran Church, William Weis’ burial site was graced with a stunning urn – so stunning that vandals threatened it. So, today the urn and Weis’ pots bear witness on a secure shelf at St. Peters, just as others bear witness at the Shepherdstown Historic museum, The County Visitors Center, the Jefferson County Museum, and there is the effort to preserve their memory by Pam and Ren Parziale. To this their traditional skills are also kept fresh by Joy Bridy in her modern pottery, but also keeping the ways of the Weises close at hand, literally.
Thanks to Joy Bridy at joybridy.com
Made possible with the generous, community-minded support of American Public University System (apus.edu)
Researched, written, produced by Jim Surkamp.
Primary References:
Weis Pots courtesy St. Peter’s Lutheran Church, Shepherdstown, WV; Jefferson County Museum, Charles Town, WV; and Historic Shepherdstown Museum.
wikiclay.com
heat-work.blogspot.com
ceramica.wikia.com
wvculture.org
wikipedia.org
nlm.nih.gov
studiopottery.com
wvgeohistory.org
Barber, E. A. (1893). “The Pottery and Porcelain of the United States.” New York, NY: G.P. Putnam’s & Sons.
Bourry, Emile; Wilton P. Rix. (1901). ”Treatise on Ceramic Industries: A Complete Manual for Pottery, Tile and Brick Works.” London, UK: Scott & Greenwood & Co.
POTTERY-EARTHENWARE-KILN-TOOLS
Encyclopédie, ou dictionnaire raisonné des sciences, des arts et des métiers (Encyclopaedia, or a Systematic Dictionary of the Sciences, Arts, and Crafts). 1751. edited by Denis Diderot and Jean le Rond d’Alembert Paris, Fr: André le Breton, publisher.
Kenamond, A. D. (1963). “Prominent Men of Shepherdstown, 1762-1962.” Charles Town, WV: Jefferson County Historical Society.
Mitchell, Mary B. “Memories.” edited by Nina Mitchell. Shepherd University Library.
Moler, Mrs. M. S. R.(1940). “George Weis and His Pottery.” Magazine of the Jefferson County Historical Society Vol. 6. pp.16-17.
Morton, Clyde D. (1987). “The Weis Pottery and the Genealogy of the Potters.” Magazine of the Jefferson County Historical Society Vol. 52. pp. 48-55.
Parziale, Reynolds and Pamela. (1981). “Pottery in the 1800s. The Weis Pottery, Shepherdstown, West Virginia.” Magazine of the Jefferson County Historical Society Vol. 47. pp. 23-29.
Rice, A. H.; John Baer Stoudt. (1929). “The Shenandoah Pottery.” Strasburg, VA: Shenandoah Publishing House, Inc.
Sanderson, Robert; Coll Monigue. (2000). “Wood-fired Ceramics: Contemporary Practices.” Philadelphia, PA: University of Pennsylvania Press. pp. 10-14.
Sweezy, Nancy. (1994). “Raised in Clay: The Southern Pottery Tradition.” Chapel Hill, NC: University of North Carolina Press.
Timbrell, John. (2005). “The Poison Paradox: Chemicals as Friends and Foes.” Oxford, UK: Oxford University Press. Print.
Weaver, Emma. (1967). “Artisans of the Appalachians.” Photos by Edward L. Dupuy. Asheville, North Carolina: Miller Printing Co.
1860 U.S. Federal Census – Population – National Archive and Records Administration (NARA).
Next, I’ll actually pull up the walls of the vessel. This is the part that looks fun
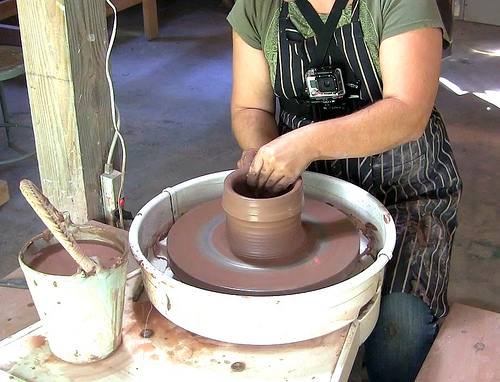
Image by Jim Surkamp
Pots Thru Time With Joy Bridy – This is local clay dug up from around the foundation of my house and I’m going to process it in this old bath tub, and before I process it, I break it up in little pieces and screen it through some hardware cloth, which helps to get any stones, weeds, detritus out of it. This clay does not have high plasticity which means it is a little harder to work with. plasticity definition: Capable of being formed into a shape or moulded without cracking. It might break and crack as I work with it, but that’s probably what I like about it. It adds character, instead of plasticity. It’s also reddish brown stoneware, not real white like a porcelain and not super iron-rich. It won’t be black sort of an orangish color when it’s fired. It will have some porousness. I fire it to a high enough temperature that it’s useful as functional ware as well as sculptural. This clay is also local clay and I’ll break it up into small marble-size pieces and slake it down in water in which I’ll run my hands through it for about ten or fifteen minutes (per) each bucket to get any rocks and stones and grass out. Then I’ll process this clay – once it’s wet – by drying it out slowly on top of bed sheets in the sun – so it’s a nice working consistancy. After I make the pieces I bisque fire them once. Then I’ll glaze and fire them in my wood kiln. (This is my wood kiln here). This is my wood kiln. I designed and built it five years ago. It’s a very old and traditional style and it’s fueled one hundred per cent with wood. I don’t know what the process would have been in the early eras of Weis pottery – if they would have used wood (They used wood and they used groundhog kilns). Ahh groundhog kilns are the type of kiln that I’m trained in. They tend to be long and flame-like, and very low and in the ground; and they fire for a similar amount of time as this kiln. When I fired this kiln, it fires for three days around the clock and Weis pottery would have done a very similar thing. Once you start a firing, you can’t leave it alone. You have to stay with it the whole time. Pots fill the chamber all the way up to the top, from the side wall, all the way up to the bagwall which you can see on the inside. The flame comes in from the fire box into the ware chamber, brings heat and ash and deposits- ash on the pots – leaves flame markings on the pots – then leaves through the exit flues into the chimney and straight up. My kiln reaches 2400 degrees, which is a high, (for) stoneware temperature. Traditionally, I think, kilns were fired a little cooler, probably 2000-2100 degrees. But wood can reach any temperature you would like depending on your combustion zone, your ware chamber, and your chimney. A fifth generation potter Davis P. Brown observed: “Speaking of firing, lots of people think red’s HOT. Red-hot ain’t even hot; when it’s HOT and you look in them, it’s like looking into the sun.” I use scrap wood. I use anything that doesn’t burn in the wood stove and anything that I would burn in a bonfire. So lots of limbs. The skinny limbs have the most minerals so you get the most interesting deposits and they allow for the most flexibility in gaining heat. And it’s all scrap. (I did some research, Joy, showing the data about the Weis’ pottery operation in 1850. And they reported that they spent seven hundred period dollars for a year’s work and they used six hundred cords of wood and a whole lot of lead. what does that signify to you, as a potter?). Six hundred cords of wood is a lot of wood! For me a cord of wood is eight foot by eight foot by four foot, and in a firing I go through maybe two cords of wood. With the groundhog style kiln, they were very inefficient. So they were stoking wood constantly and a lot of that fuel was leaving the kiln as smoke. Nowadays we know a little more on how to capture that fuel better. “A,” it tells me that we had a lot of wood in this area. Six hundred cords of wood is a huge amount of wood. And “B,” the lead is interesting because a lot of our local clays makes a really wonderful “slip,” that also makes a glaze on the inside of the pot. (A slip?) A slip is like a watered down clay. So a “paint” or a “glaze.” A lot of people use the terms back and forth. It would be what you would glaze with. So if they were using lead, it would be very bad for their health. They probably didn’t live long. and “B” it’s expensive. Even then it was expensive, but it was what people thought they needed to do. Nowadays we know that we can use all these natural things, and the styles that I work in are much more akin to what the Weis potters could have been doing in that I use a lot of local clays. I mix my glazes out of ashes and clay bodies. So I have a very low overhead compared to what they did in that I’m not buying any lead, I’m not buying any expensive colorants that they would have done. My studio is similar to the way they would work in that I have a closed system. My water comes from a rain barrel. I don’t have any running water. My kiln is fired with wood. I don’t fire a gas kiln which a lot of people do nowadays. And my clay is closed-cycle: whatever clay comes into my studio I keep recycling until it turns into pots. And, anything I don’t like I “slip” back down and make clay out of it again, which would have been a practice during their time. So everything stays within the studio. (So in many ways, you’re doing a traditional method that the Weises did, but with greater efficiency). It may have been an aesthetic choice for them in that they chose to do specifically what they were doing. As it is now, I could use a very expensive overhead, using porcelain from China and Europe and using glazes that I buy pre-mixed that have expensive rare earth elements in them. But I prefer the more elementary approach in that I like using clay. I like the variables that come into play with wood firing, and with using ash glazes and with mixing a lot of my own ingredients. This my kiln. This is the firebox of my Bourry box wood kiln. It’s different from a groundhog style in that the groundhog style kilns would have been in the ground. You would have had to crawl to get in them. You would have entered only through the front through a very small opening and had to load everything while on your knees. This is the front. This is the fire box. This is where the fire starts. I load it through the ware chamber door which then gets bricked up with rows of bricks. This side is the firebox where the actual fire occurs, and it starts in the bottom. Once the fire hits about eleven hundred degrees, I can close up this door. (How long does that take Joy?) . It takes a day and a half. Then I can open the side-stoking doors on both sides and start stoking across the top, which allows me to reach a temperature of twenty-four hundred degrees inside the chamber. It’s hotter in the firebox, but that’s the chamber temperature. (What type of design is this called?) This is called a “bourry” box – B-O-U-R-R-Y. It’a an Australian design. What it does – it’s a very efficient, wood-burning kiln because the wood is burning up here and the coal bed is down below. Air comes in. It burns the wood, but then all the smoke and the waste products that would be going up the chimney burn off over the coal bed. So I get what we refer to as a “double burn cycle:” getting heat during the first burn of the wood and extra heat as the smoke and gasses burn off. So it’s very efficient. I get no smoke and no waste product in that way, and I use half as much wood that I would in a kiln of this size without the Bourry box fire. It’s a crossed-dressed kiln because the fire box is here and then everything goes up into the chamber and then back down across from the firebox. It’s more to the flame pattern. Groundhog kilns are often called updraft although they are kind of a hybrid, because if you imagine a flame-shaped kiln it’s also going uphill. So your firebox is down below and you’re stoking the wood, and then the kiln goes up and the chimney’s at the top. So it has a little different pull to it. The chimney is always the engine of the kiln. It’s always what’s pulling the heat and flame through the kiln. This is called “wedging” the clay and what it does is it increases plasticity, which means that as you’re working with it, it will stretch a little easier. It also removes air bubbles and makes it smoother to work with in general. Every piece I make has to go across the wedging board. (This is the process they would do back in the 1800s?). This is as old as it gets: with a heavy round wheel at the bottom and a small light round wheel at the top. It’s been done in every culture across the globe. My rims are probably thin compared to theirs (Weises), because I’m used to a more contemporary look and feel. Theirs probably would have been a little beefier, easier to grab, easier to use. (Somebody made the comment that they were like the fiesta ware of their period) um-hm. Yeh. That’s all they had. And they’re all remarkably similar no matter where you go, especially in the Appalachian foothills. If you did/do the kick wheel, you can’t be in a hurry. This would have been a relative of a classic crock form, which would have been useful in every kitchen across the county during the years the Weis family was in operation. It would have been their bread and butter literally. And their tools would have been extremely similar: a wooden stick, some kind of sponge. Something with a point just in case. And for decoration: a fingernail; everybody would have their decoration around here (side of crock), seems to have been some fingernail marks. We can do another one on the electric. This is starting to center the clay on the wheelhead, and before I can actually make the piece, the clay has to be in the center of the wheel completely. These are all different techniques that help make that happen. This is called wedging on the wheel, where I squeeze it up and then lean it back down, and it also helps to align the particles. I have a modern-day wheel here. This is an electric wheel, which is silent, which is really nice. I center the clay if it comes closer to the starting shape that I want. And the first thing that I do to actually throw the pot is called “opening.” I sink my thumbs into the middle and start to create the “inside” versus the “outside.” Now I’m setting the bottom. Without compressing the clay, you end up getting cracks and flaws in the bottom. Using the pressure of my fingers against the wheelhead, compressing the clay between the two makes for a strong, useful pot. Next, I’ll actually pull up the walls of the vessel. This is the part that looks fun – and IS fun. As the pot gets closer to the form that I want, I fine-tune it with different tools. All of them could have been used in any era. This a wooden rib, and, again, it compresses the clay particles. What I’m looking for is a wall that’s even – thin, but not too thin. I want it to be sturdy when it’s used, but not too heavy. So I dance in between thin versus sturdy. At this point where the wall feels good, that I start to think about the form. I find one of the most important parts is the rim. It has to look good, but it also has to be compressed, because it is very common to bang it on a kitchen sink and it would chip if it wasn’t compressed very well. So it’s important to spend a little extra time, making sure that functional pots actually work. (Is that maybe why the Weises had kind of a strong lip?) Yes. A little extra clay at the foot, because that’s also a spot. I’m lucky enough to come out of the tradition of functional pottery throughout history, when I was in Pennsylvania I used to visit the groundhog kiln sites there. What became of the Wise family? Wrote Mary Bedinger Mitchell of her early years in Shepherdstown in the 1850s: “The town was thriving. There was a brick kiln and a very interesting primitive manufactory of the glazed crocks or earthen pots so much in use. It was carried on by an old man in the old house and had quite a medieval flavor.” After the Weis men would dig up and load the low-plasticity, red-burning clay on the outer bend in the Potomac nearby, they would bring it by wagon back to their worksite. To children like Mary the clay mill “was of absorbing interest, and they hoped for a ride on the long wooden shaft or tongue, to which the gentle horse was hitched along going round and round in a prescribed circle, as it patiently ground the clay into a fine smooth powder. A stone burr working on the same principle as a flour mill did the work. Time progressed and tastes changed in favor of the blue glazed crocks and jugs and the Weis manufactory went into a long, slow decline through the rest of the 19th century, the family finally selling their home to George Beltzhoover. Ever faithful at St. Peter’s Lutheran Church, William Weis’ burial site was graced with a stunning urn – so stunning that vandals threatened it. So, today the urn and Weis’ pots bear witness on a secure shelf at St. Peters, just as others bear witness at the Shepherdstown Historic museum, The County Visitors Center, the Jefferson County Museum, and there is the effort to preserve their memory by Pam and Ren Parziale. To this their traditional skills are also kept fresh by Joy Bridy in her modern pottery, but also keeping the ways of the Weises close at hand, literally.
Thanks to Joy Bridy at joybridy.com
Made possible with the generous, community-minded support of American Public University System (apus.edu)
Researched, written, produced by Jim Surkamp.
Primary References:
Weis Pots courtesy St. Peter’s Lutheran Church, Shepherdstown, WV; Jefferson County Museum, Charles Town, WV; and Historic Shepherdstown Museum.
wikiclay.com
heat-work.blogspot.com
ceramica.wikia.com
wvculture.org
wikipedia.org
nlm.nih.gov
studiopottery.com
wvgeohistory.org
Barber, E. A. (1893). “The Pottery and Porcelain of the United States.” New York, NY: G.P. Putnam’s & Sons.
Bourry, Emile; Wilton P. Rix. (1901). ”Treatise on Ceramic Industries: A Complete Manual for Pottery, Tile and Brick Works.” London, UK: Scott & Greenwood & Co.
POTTERY-EARTHENWARE-KILN-TOOLS
Encyclopédie, ou dictionnaire raisonné des sciences, des arts et des métiers (Encyclopaedia, or a Systematic Dictionary of the Sciences, Arts, and Crafts). 1751. edited by Denis Diderot and Jean le Rond d’Alembert Paris, Fr: André le Breton, publisher.
Kenamond, A. D. (1963). “Prominent Men of Shepherdstown, 1762-1962.” Charles Town, WV: Jefferson County Historical Society.
Mitchell, Mary B. “Memories.” edited by Nina Mitchell. Shepherd University Library.
Moler, Mrs. M. S. R.(1940). “George Weis and His Pottery.” Magazine of the Jefferson County Historical Society Vol. 6. pp.16-17.
Morton, Clyde D. (1987). “The Weis Pottery and the Genealogy of the Potters.” Magazine of the Jefferson County Historical Society Vol. 52. pp. 48-55.
Parziale, Reynolds and Pamela. (1981). “Pottery in the 1800s. The Weis Pottery, Shepherdstown, West Virginia.” Magazine of the Jefferson County Historical Society Vol. 47. pp. 23-29.
Rice, A. H.; John Baer Stoudt. (1929). “The Shenandoah Pottery.” Strasburg, VA: Shenandoah Publishing House, Inc.
Sanderson, Robert; Coll Monigue. (2000). “Wood-fired Ceramics: Contemporary Practices.” Philadelphia, PA: University of Pennsylvania Press. pp. 10-14.
Sweezy, Nancy. (1994). “Raised in Clay: The Southern Pottery Tradition.” Chapel Hill, NC: University of North Carolina Press.
Timbrell, John. (2005). “The Poison Paradox: Chemicals as Friends and Foes.” Oxford, UK: Oxford University Press. Print.
Weaver, Emma. (1967). “Artisans of the Appalachians.” Photos by Edward L. Dupuy. Asheville, North Carolina: Miller Printing Co.
1860 U.S. Federal Census – Population – National Archive and Records Administration (NARA).
Wrote Mary Bedinger Mitchell of her early years in Shepherdstown in the 1850s-2
Image by Jim Surkamp
Pots Thru Time With Joy Bridy – This is local clay dug up from around the foundation of my house and I’m going to process it in this old bath tub, and before I process it, I break it up in little pieces and screen it through some hardware cloth, which helps to get any stones, weeds, detritus out of it. This clay does not have high plasticity which means it is a little harder to work with. plasticity definition: Capable of being formed into a shape or moulded without cracking. It might break and crack as I work with it, but that’s probably what I like about it. It adds character, instead of plasticity. It’s also reddish brown stoneware, not real white like a porcelain and not super iron-rich. It won’t be black sort of an orangish color when it’s fired. It will have some porousness. I fire it to a high enough temperature that it’s useful as functional ware as well as sculptural. This clay is also local clay and I’ll break it up into small marble-size pieces and slake it down in water in which I’ll run my hands through it for about ten or fifteen minutes (per) each bucket to get any rocks and stones and grass out. Then I’ll process this clay – once it’s wet – by drying it out slowly on top of bed sheets in the sun – so it’s a nice working consistancy. After I make the pieces I bisque fire them once. Then I’ll glaze and fire them in my wood kiln. (This is my wood kiln here). This is my wood kiln. I designed and built it five years ago. It’s a very old and traditional style and it’s fueled one hundred per cent with wood. I don’t know what the process would have been in the early eras of Weis pottery – if they would have used wood (They used wood and they used groundhog kilns). Ahh groundhog kilns are the type of kiln that I’m trained in. They tend to be long and flame-like, and very low and in the ground; and they fire for a similar amount of time as this kiln. When I fired this kiln, it fires for three days around the clock and Weis pottery would have done a very similar thing. Once you start a firing, you can’t leave it alone. You have to stay with it the whole time. Pots fill the chamber all the way up to the top, from the side wall, all the way up to the bagwall which you can see on the inside. The flame comes in from the fire box into the ware chamber, brings heat and ash and deposits- ash on the pots – leaves flame markings on the pots – then leaves through the exit flues into the chimney and straight up. My kiln reaches 2400 degrees, which is a high, (for) stoneware temperature. Traditionally, I think, kilns were fired a little cooler, probably 2000-2100 degrees. But wood can reach any temperature you would like depending on your combustion zone, your ware chamber, and your chimney. A fifth generation potter Davis P. Brown observed: “Speaking of firing, lots of people think red’s HOT. Red-hot ain’t even hot; when it’s HOT and you look in them, it’s like looking into the sun.” I use scrap wood. I use anything that doesn’t burn in the wood stove and anything that I would burn in a bonfire. So lots of limbs. The skinny limbs have the most minerals so you get the most interesting deposits and they allow for the most flexibility in gaining heat. And it’s all scrap. (I did some research, Joy, showing the data about the Weis’ pottery operation in 1850. And they reported that they spent seven hundred period dollars for a year’s work and they used six hundred cords of wood and a whole lot of lead. what does that signify to you, as a potter?). Six hundred cords of wood is a lot of wood! For me a cord of wood is eight foot by eight foot by four foot, and in a firing I go through maybe two cords of wood. With the groundhog style kiln, they were very inefficient. So they were stoking wood constantly and a lot of that fuel was leaving the kiln as smoke. Nowadays we know a little more on how to capture that fuel better. “A,” it tells me that we had a lot of wood in this area. Six hundred cords of wood is a huge amount of wood. And “B,” the lead is interesting because a lot of our local clays makes a really wonderful “slip,” that also makes a glaze on the inside of the pot. (A slip?) A slip is like a watered down clay. So a “paint” or a “glaze.” A lot of people use the terms back and forth. It would be what you would glaze with. So if they were using lead, it would be very bad for their health. They probably didn’t live long. and “B” it’s expensive. Even then it was expensive, but it was what people thought they needed to do. Nowadays we know that we can use all these natural things, and the styles that I work in are much more akin to what the Weis potters could have been doing in that I use a lot of local clays. I mix my glazes out of ashes and clay bodies. So I have a very low overhead compared to what they did in that I’m not buying any lead, I’m not buying any expensive colorants that they would have done. My studio is similar to the way they would work in that I have a closed system. My water comes from a rain barrel. I don’t have any running water. My kiln is fired with wood. I don’t fire a gas kiln which a lot of people do nowadays. And my clay is closed-cycle: whatever clay comes into my studio I keep recycling until it turns into pots. And, anything I don’t like I “slip” back down and make clay out of it again, which would have been a practice during their time. So everything stays within the studio. (So in many ways, you’re doing a traditional method that the Weises did, but with greater efficiency). It may have been an aesthetic choice for them in that they chose to do specifically what they were doing. As it is now, I could use a very expensive overhead, using porcelain from China and Europe and using glazes that I buy pre-mixed that have expensive rare earth elements in them. But I prefer the more elementary approach in that I like using clay. I like the variables that come into play with wood firing, and with using ash glazes and with mixing a lot of my own ingredients. This my kiln. This is the firebox of my Bourry box wood kiln. It’s different from a groundhog style in that the groundhog style kilns would have been in the ground. You would have had to crawl to get in them. You would have entered only through the front through a very small opening and had to load everything while on your knees. This is the front. This is the fire box. This is where the fire starts. I load it through the ware chamber door which then gets bricked up with rows of bricks. This side is the firebox where the actual fire occurs, and it starts in the bottom. Once the fire hits about eleven hundred degrees, I can close up this door. (How long does that take Joy?) . It takes a day and a half. Then I can open the side-stoking doors on both sides and start stoking across the top, which allows me to reach a temperature of twenty-four hundred degrees inside the chamber. It’s hotter in the firebox, but that’s the chamber temperature. (What type of design is this called?) This is called a “bourry” box – B-O-U-R-R-Y. It’a an Australian design. What it does – it’s a very efficient, wood-burning kiln because the wood is burning up here and the coal bed is down below. Air comes in. It burns the wood, but then all the smoke and the waste products that would be going up the chimney burn off over the coal bed. So I get what we refer to as a “double burn cycle:” getting heat during the first burn of the wood and extra heat as the smoke and gasses burn off. So it’s very efficient. I get no smoke and no waste product in that way, and I use half as much wood that I would in a kiln of this size without the Bourry box fire. It’s a crossed-dressed kiln because the fire box is here and then everything goes up into the chamber and then back down across from the firebox. It’s more to the flame pattern. Groundhog kilns are often called updraft although they are kind of a hybrid, because if you imagine a flame-shaped kiln it’s also going uphill. So your firebox is down below and you’re stoking the wood, and then the kiln goes up and the chimney’s at the top. So it has a little different pull to it. The chimney is always the engine of the kiln. It’s always what’s pulling the heat and flame through the kiln. This is called “wedging” the clay and what it does is it increases plasticity, which means that as you’re working with it, it will stretch a little easier. It also removes air bubbles and makes it smoother to work with in general. Every piece I make has to go across the wedging board. (This is the process they would do back in the 1800s?). This is as old as it gets: with a heavy round wheel at the bottom and a small light round wheel at the top. It’s been done in every culture across the globe. My rims are probably thin compared to theirs (Weises), because I’m used to a more contemporary look and feel. Theirs probably would have been a little beefier, easier to grab, easier to use. (Somebody made the comment that they were like the fiesta ware of their period) um-hm. Yeh. That’s all they had. And they’re all remarkably similar no matter where you go, especially in the Appalachian foothills. If you did/do the kick wheel, you can’t be in a hurry. This would have been a relative of a classic crock form, which would have been useful in every kitchen across the county during the years the Weis family was in operation. It would have been their bread and butter literally. And their tools would have been extremely similar: a wooden stick, some kind of sponge. Something with a point just in case. And for decoration: a fingernail; everybody would have their decoration around here (side of crock), seems to have been some fingernail marks. We can do another one on the electric. This is starting to center the clay on the wheelhead, and before I can actually make the piece, the clay has to be in the center of the wheel completely. These are all different techniques that help make that happen. This is called wedging on the wheel, where I squeeze it up and then lean it back down, and it also helps to align the particles. I have a modern-day wheel here. This is an electric wheel, which is silent, which is really nice. I center the clay if it comes closer to the starting shape that I want. And the first thing that I do to actually throw the pot is called “opening.” I sink my thumbs into the middle and start to create the “inside” versus the “outside.” Now I’m setting the bottom. Without compressing the clay, you end up getting cracks and flaws in the bottom. Using the pressure of my fingers against the wheelhead, compressing the clay between the two makes for a strong, useful pot. Next, I’ll actually pull up the walls of the vessel. This is the part that looks fun – and IS fun. As the pot gets closer to the form that I want, I fine-tune it with different tools. All of them could have been used in any era. This a wooden rib, and, again, it compresses the clay particles. What I’m looking for is a wall that’s even – thin, but not too thin. I want it to be sturdy when it’s used, but not too heavy. So I dance in between thin versus sturdy. At this point where the wall feels good, that I start to think about the form. I find one of the most important parts is the rim. It has to look good, but it also has to be compressed, because it is very common to bang it on a kitchen sink and it would chip if it wasn’t compressed very well. So it’s important to spend a little extra time, making sure that functional pots actually work. (Is that maybe why the Weises had kind of a strong lip?) Yes. A little extra clay at the foot, because that’s also a spot. I’m lucky enough to come out of the tradition of functional pottery throughout history, when I was in Pennsylvania I used to visit the groundhog kiln sites there. What became of the Wise family? Wrote Mary Bedinger Mitchell of her early years in Shepherdstown in the 1850s: “The town was thriving. There was a brick kiln and a very interesting primitive manufactory of the glazed crocks or earthen pots so much in use. It was carried on by an old man in the old house and had quite a medieval flavor.” After the Weis men would dig up and load the low-plasticity, red-burning clay on the outer bend in the Potomac nearby, they would bring it by wagon back to their worksite. To children like Mary the clay mill “was of absorbing interest, and they hoped for a ride on the long wooden shaft or tongue, to which the gentle horse was hitched along going round and round in a prescribed circle, as it patiently ground the clay into a fine smooth powder. A stone burr working on the same principle as a flour mill did the work. Time progressed and tastes changed in favor of the blue glazed crocks and jugs and the Weis manufactory went into a long, slow decline through the rest of the 19th century, the family finally selling their home to George Beltzhoover. Ever faithful at St. Peter’s Lutheran Church, William Weis’ burial site was graced with a stunning urn – so stunning that vandals threatened it. So, today the urn and Weis’ pots bear witness on a secure shelf at St. Peters, just as others bear witness at the Shepherdstown Historic museum, The County Visitors Center, the Jefferson County Museum, and there is the effort to preserve their memory by Pam and Ren Parziale. To this their traditional skills are also kept fresh by Joy Bridy in her modern pottery, but also keeping the ways of the Weises close at hand, literally.
Thanks to Joy Bridy at joybridy.com
Made possible with the generous, community-minded support of American Public University System (apus.edu)
Researched, written, produced by Jim Surkamp.
Primary References:
Weis Pots courtesy St. Peter’s Lutheran Church, Shepherdstown, WV; Jefferson County Museum, Charles Town, WV; and Historic Shepherdstown Museum.
wikiclay.com
heat-work.blogspot.com
ceramica.wikia.com
wvculture.org
wikipedia.org
nlm.nih.gov
studiopottery.com
wvgeohistory.org
Barber, E. A. (1893). “The Pottery and Porcelain of the United States.” New York, NY: G.P. Putnam’s & Sons.
Bourry, Emile; Wilton P. Rix. (1901). ”Treatise on Ceramic Industries: A Complete Manual for Pottery, Tile and Brick Works.” London, UK: Scott & Greenwood & Co.
POTTERY-EARTHENWARE-KILN-TOOLS
Encyclopédie, ou dictionnaire raisonné des sciences, des arts et des métiers (Encyclopaedia, or a Systematic Dictionary of the Sciences, Arts, and Crafts). 1751. edited by Denis Diderot and Jean le Rond d’Alembert Paris, Fr: André le Breton, publisher.
Kenamond, A. D. (1963). “Prominent Men of Shepherdstown, 1762-1962.” Charles Town, WV: Jefferson County Historical Society.
Mitchell, Mary B. “Memories.” edited by Nina Mitchell. Shepherd University Library.
Moler, Mrs. M. S. R.(1940). “George Weis and His Pottery.” Magazine of the Jefferson County Historical Society Vol. 6. pp.16-17.
Morton, Clyde D. (1987). “The Weis Pottery and the Genealogy of the Potters.” Magazine of the Jefferson County Historical Society Vol. 52. pp. 48-55.
Parziale, Reynolds and Pamela. (1981). “Pottery in the 1800s. The Weis Pottery, Shepherdstown, West Virginia.” Magazine of the Jefferson County Historical Society Vol. 47. pp. 23-29.
Rice, A. H.; John Baer Stoudt. (1929). “The Shenandoah Pottery.” Strasburg, VA: Shenandoah Publishing House, Inc.
Sanderson, Robert; Coll Monigue. (2000). “Wood-fired Ceramics: Contemporary Practices.” Philadelphia, PA: University of Pennsylvania Press. pp. 10-14.
Sweezy, Nancy. (1994). “Raised in Clay: The Southern Pottery Tradition.” Chapel Hill, NC: University of North Carolina Press.
Timbrell, John. (2005). “The Poison Paradox: Chemicals as Friends and Foes.” Oxford, UK: Oxford University Press. Print.
Weaver, Emma. (1967). “Artisans of the Appalachians.” Photos by Edward L. Dupuy. Asheville, North Carolina: Miller Printing Co.
1860 U.S. Federal Census – Population – National Archive and Records Administration (NARA).